メインコンテンツまでスキップ

· 約4分
moritalous
お知らせ

過去にQiitaに投稿した内容のアーカイブです。

arm64向けのKibanaのコンテナイメージの作成に成功したので、Kubernetes上で構築してみました。 (コンテナイメージの作成方法とDocker Composeでの構築はこちらを参照)

Helmのインストール

wget https://get.helm.sh/helm-v3.3.1-linux-arm64.tar.gz
tar zxvf helm-v3.3.1-linux-arm64.tar.gz
cd linux-arm64/
sudo install helm /usr/local/bin

動作確認

 $ helm version
version.BuildInfo{Version:"v3.3.1", GitCommit:"249e5215cde0c3fa72e27eb7a30e8d55c9696144", GitTreeState:"clean", GoVersion:"go1.14.7"}
$

HelmのElasticリポジトリ設定

Elastic Stack Kubernetes Helm Charts https://github.com/elastic/helm-charts

helm repo add elastic https://helm.elastic.co
$ helm search repo elastic
NAME CHART VERSION APP VERSION DESCRIPTION
elastic/elasticsearch 7.9.1 7.9.1 Official Elastic helm chart for Elasticsearch
elastic/apm-server 7.9.1 7.9.1 Official Elastic helm chart for Elastic APM Server
elastic/filebeat 7.9.1 7.9.1 Official Elastic helm chart for Filebeat
elastic/kibana 7.9.1 7.9.1 Official Elastic helm chart for Kibana
elastic/logstash 7.9.1 7.9.1 Official Elastic helm chart for Logstash
elastic/metricbeat 7.9.1 7.9.1 Official Elastic helm chart for Metricbeat
$

Elasticsearch環境の構築

PersistentVolumeの作成

Helmのインストールの前にPersistentVolumeを作成します。

apiVersion: v1
kind: PersistentVolume
metadata:
name: es-pv-volume
labels:
type: local
app: elasticsearch-master
spec:
storageClassName: standard
capacity:
storage: 1Gi
persistentVolumeReclaimPolicy: Delete
accessModes:
- ReadWriteOnce
hostPath:
path: "/data/elasticsearch"

/data/elasticsearchディレクトリを自動生成させると、rootユーザーが所有者となってPodの起動が失敗しましたので、先にホストOS側で準備しておきます

mkdir /data/elasticsearch
chown 1000:1000 /data/elasticsearch

Elasticsearch Helm Chartのインストール

minikube環境向けのサンプルがありますので、そちらを元にしました。imageTagreplicasだけ独自に足しました。

https://github.com/elastic/helm-charts/tree/master/elasticsearch/examples/minikube

---
imageTag: 7.9.1

replicas: 1

## Permit co-located instances for solitary minikube virtual machines.
antiAffinity: "soft"

## Shrink default JVM heap.
esJavaOpts: "-Xmx128m -Xms128m"

## Allocate smaller chunks of memory per pod.
resources:
requests:
cpu: "100m"
memory: "512M"
limits:
cpu: "1000m"
memory: "512M"

## Request smaller persistent volumes.
volumeClaimTemplate:
accessModes: [ "ReadWriteOnce" ]
storageClassName: "standard"
resources:
requests:
storage: 100M
helm install elasticsearch elastic/elasticsearch --values ./values.yml

うまく行けば一式起動します

 $ kubectl get service,statefulset,pod,persistentvolumeclaim,persistentvolume --namespace=default -l app=elasticsearch-master
NAME TYPE CLUSTER-IP EXTERNAL-IP PORT(S) AGE
service/elasticsearch-master ClusterIP 10.103.52.98 <none> 9200/TCP,9300/TCP 6h38m
service/elasticsearch-master-headless ClusterIP None <none> 9200/TCP,9300/TCP 6h38m

NAME READY AGE
statefulset.apps/elasticsearch-master 1/1 6h38m

NAME READY STATUS RESTARTS AGE
pod/elasticsearch-master-0 1/1 Running 2 6h38m

NAME STATUS VOLUME CAPACITY ACCESS MODES STORAGECLASS AGE
persistentvolumeclaim/elasticsearch-master-elasticsearch-master-0 Bound es-pv-volume 1Gi RWO standard 6h38m

NAME CAPACITY ACCESS MODES RECLAIM POLICY STATUS CLAIM STORAGECLASS REASON AGE
persistentvolume/es-pv-volume 1Gi RWO Delete Bound default/elasticsearch-master-elasticsearch-master-0 standard 6h43m
$

Kibana環境の構築

Kibana Helm Chartのインストール

Kibanaもvalues.ymlを用意します。

Kibanaはarm64向けコンテナイメージが提供されていないので、自前で作成しました。 (詳しい説明はこちら

---
image: "ghcr.io/moritalous/ghcr/kibana-arm64"
imageTag: 7.9.1

service:
type: NodePort
port: 5601
nodePort: 30601
helm install kibana elastic/kibana --values ./values.yml

起動確認

$ kubectl get service,deployment,pod --namespace=default -l app=kibana
NAME TYPE CLUSTER-IP EXTERNAL-IP PORT(S) AGE
service/kibana-kibana NodePort 10.109.131.74 <none> 5601:30601/TCP 8h

NAME READY UP-TO-DATE AVAILABLE AGE
deployment.apps/kibana-kibana 1/1 1 1 8h

NAME READY STATUS RESTARTS AGE
pod/kibana-kibana-56b7b6c95c-vj6sv 1/1 Running 0 7h37m
$

動作確認

http://raspberrypi.local:30601/

image.png

· 約5分
moritalous
お知らせ

過去にQiitaに投稿した内容のアーカイブです。

arm64向けKibanaのコンテナイメージを公開してみました。よければご利用ください。

ghcr.io/moritalous/ghcr/kibana-arm64

arm64向けDockerfile

Kibanaはリリースファイルには、Node.jsの実行バイナリがまるごと含まれており、これがx64向けのものなのでarm64では動きません。 ですので、Node.jsの実行バイナリ(/usr/share/kibana/node以下)をarm64のものに差し替えます。

また、dumb-initもarm64版に変更します。

元にしたのはGitHubで公開されている公式のDockerfileです。

#
## ** THIS IS AN AUTO-GENERATED FILE **
#

################################################################################
## Build stage 0
## Extract Kibana and make various file manipulations.
################################################################################
FROM centos:7 AS prep_files
## Add tar and gzip
RUN yum update -y && yum install -y tar gzip && yum clean all
RUN cd /opt && curl --retry 8 -s -L -O https://artifacts.elastic.co/downloads/kibana/kibana-7.9.1-linux-x86_64.tar.gz && cd -
RUN mkdir /usr/share/kibana
WORKDIR /usr/share/kibana
RUN tar --strip-components=1 -zxf /opt/kibana-7.9.1-linux-x86_64.tar.gz
+
+ RUN cd /opt && curl --retry 8 -s -L -O https://nodejs.org/dist/v10.22.0/node-+v10.22.0-linux-arm64.tar.gz && cd -
+ RUN rm -rf /usr/share/kibana/node
+ RUN mkdir /usr/share/kibana/node
+ RUN cd /usr/share/kibana/node && tar --strip-components=1 -zxf /opt/node-v10.22.0-linux-arm64.tar.gz && cd -

## Ensure that group permissions are the same as user permissions.
## This will help when relying on GID-0 to run Kibana, rather than UID-1000.
## OpenShift does this, for example.
## REF: https://docs.openshift.org/latest/creating_images/guidelines.html
RUN chmod -R g=u /usr/share/kibana
RUN find /usr/share/kibana -type d -exec chmod g+s {} \;

################################################################################
## Build stage 1
## Copy prepared files from the previous stage and complete the image.
################################################################################
FROM centos:7
EXPOSE 5601

## Add Reporting dependencies.
RUN yum update -y && yum install -y fontconfig freetype shadow-utils && yum clean all

## Add an init process, check the checksum to make sure it's a match
- RUN curl -L -o /usr/local/bin/dumb-init https://github.com/Yelp/dumb-init/releases/download/v1.2.2/dumb-init_1.2.2_amd64
- RUN echo "37f2c1f0372a45554f1b89924fbb134fc24c3756efaedf11e07f599494e0eff9 /usr/local/bin/dumb-init" | sha256sum -c -
+ RUN curl -L -o /usr/local/bin/dumb-init https://github.com/Yelp/dumb-init/releases/download/v1.2.2/dumb-init_1.2.2_arm64
+ RUN echo "45b1bbf56cc03edda81e4220535a025bfe3ed6e93562222b9be4471005b3eeb3 /usr/local/bin/dumb-init" | sha256sum -c -
RUN chmod +x /usr/local/bin/dumb-init


## Bring in Kibana from the initial stage.
COPY --from=prep_files --chown=1000:0 /usr/share/kibana /usr/share/kibana
WORKDIR /usr/share/kibana
RUN ln -s /usr/share/kibana /opt/kibana

ENV ELASTIC_CONTAINER true
ENV PATH=/usr/share/kibana/bin:$PATH

## Set some Kibana configuration defaults.
COPY --chown=1000:0 config/kibana.yml /usr/share/kibana/config/kibana.yml

## Add the launcher/wrapper script. It knows how to interpret environment
## variables and translate them to Kibana CLI options.
COPY --chown=1000:0 bin/kibana-docker /usr/local/bin/

## Ensure gid 0 write permissions for OpenShift.
RUN chmod g+ws /usr/share/kibana && find /usr/share/kibana -gid 0 -and -not -perm /g+w -exec chmod g+w {} \;

## Remove the suid bit everywhere to mitigate "Stack Clash"
RUN find / -xdev -perm -4000 -exec chmod u-s {} +

## Provide a non-root user to run the process.
RUN groupadd --gid 1000 kibana && useradd --uid 1000 --gid 1000 --home-dir /usr/share/kibana --no-create-home kibana
USER kibana

LABEL org.label-schema.schema-version="1.0" org.label-schema.vendor="Elastic" org.label-schema.name="kibana" org.label-schema.version="7.9.1" org.label-schema.url="https://www.elastic.co/products/kibana" org.label-schema.vcs-url="https://github.com/elastic/kibana" org.label-schema.license="Elastic License" org.label-schema.usage="https://www.elastic.co/guide/en/kibana/index.html" org.label-schema.build-date="2020-09-01T22:38:56.015Z" license="Elastic License"

ENTRYPOINT ["/usr/local/bin/dumb-init", "--"]

CMD ["/usr/local/bin/kibana-docker"]

ビルドします

docker build -t moritalous/kibana-arm64:7.9.1 .

イメージ確認

$ docker images
REPOSITORY TAG IMAGE ID CREATED SIZE
moritalous/kibana-arm64 7.9.1 96c8b0365e7e About an hour ago 1.29GB
$

GitHub Container Registryに登録する

公式の手順に従います。

ログインして

cat TOKEN.txt | docker login ghcr.io -u [USERNAME] --password-stdin

タグ付けして

docker tag 96c8b0365e7e ghcr.io/moritalous/ghcr/kibana-arm64:7.9.1

プッシュ

docker push ghcr.io/moritalous/ghcr/kibana-arm64

Docker Compose

https://www.elastic.co/guide/en/elastic-stack-get-started/current/get-started-docker.html をほぼそのまま利用します。違うのはKibanaのコンテナイメージがghcr.io/moritalous/ghcr/kibana-arm64:7.9.1となるだけです。

以下の設定も忘れずに。

sysctl -w vm.max_map_count=262144

https://www.elastic.co/guide/en/elasticsearch/reference/current/vm-max-map-count.html

· 約7分
moritalous
お知らせ

過去にQiitaに投稿した内容のアーカイブです。

AWS_CLI-v2.0.36 Azure_CLI-v2.11.0 AWS IoT CoreとAzure IoT HubでIoT機器からデータをアップロードするサンプルを試しました。
手順の比較

No.AWS IoT CoreAzure IoT Hub
(事前)-Azure CLIにエクステンションを追加する
(事前)-リソース グループを作成する
1-IoT Hubを作成する
2モノを作成するデバイスを作成する
3証明書を作成する-
4ポリシーを作成する-
5証明書にポリシーをアタッチする-
6証明書にモノをアタッチする-
7送信側のプログラムを作成する送信側のプログラムを作成する
  • AzureはIoT Hubそのものを作成する手順があります。
  • 認証方式がAWSはX.509 証明書、Azureは対称キーです。他の認証方式を使うと手順も変わると思います。

AWSの手順

モノを作成する

コマンド一発です。

aws iot create-thing --thing-name Thing001

証明書を作成する

パラメータで出力ファイル名を指定しています。

aws iot create-keys-and-certificate --certificate-pem-outfile "Cert001.cert.pem" --public-key-outfile "Cert001.public.key" --private-key-outfile "Cert001.private.key" --set-as-active

この先の手順で、実行結果に含まれる証明書のARN(certificateArn)が必要となりますのでメモっておきましょう。(下の実行結果はAWS CLIのリファレンスの例です)

実行結果
実行結果
{
"certificateArn": "arn:aws:iot:us-west-2:123456789012:cert/9894ba17925e663f1d29c23af4582b8e3b7619c31f3fbd93adcb51ae54b83dc2",
"certificateId": "9894ba17925e663f1d29c23af4582b8e3b7619c31f3fbd93adcb51ae54b83dc2",
"certificatePem": "
-----BEGIN CERTIFICATE-----
MIICiTCCEXAMPLE6m7oRw0uXOjANBgkqhkiG9w0BAQUFADCBiDELMAkGA1UEBhMC
VVMxCzAJBgNVBAgEXAMPLEAwDgYDVQQHEwdTZWF0dGxlMQ8wDQYDVQQKEwZBbWF6
b24xFDASBgNVBAsTC0lBTSEXAMPLE2xlMRIwEAYDVQQDEwlUZXN0Q2lsYWMxHzAd
BgkqhkiG9w0BCQEWEG5vb25lQGFtYEXAMPLEb20wHhcNMTEwNDI1MjA0NTIxWhcN
MTIwNDI0MjA0NTIxWjCBiDELMAkGA1UEBhMCEXAMPLEJBgNVBAgTAldBMRAwDgYD
VQQHEwdTZWF0dGxlMQ8wDQYDVQQKEwZBbWF6b24xFDAEXAMPLEsTC0lBTSBDb25z
b2xlMRIwEAYDVQQDEwlUZXN0Q2lsYWMxHzAdBgkqhkiG9w0BCQEXAMPLE25lQGFt
YXpvbi5jb20wgZ8wDQYJKoZIhvcNAQEBBQADgY0AMIGJAoGBAMaK0dn+aEXAMPLE
EXAMPLEfEvySWtC2XADZ4nB+BLYgVIk60CpiwsZ3G93vUEIO3IyNoH/f0wYK8m9T
rDHudUZEXAMPLELG5M43q7Wgc/MbQITxOUSQv7c7ugFFDzQGBzZswY6786m86gpE
Ibb3OhjZnzcvQAEXAMPLEWIMm2nrAgMBAAEwDQYJKoZIhvcNAQEFBQADgYEAtCu4
nUhVVxYUntneD9+h8Mg9qEXAMPLEyExzyLwaxlAoo7TJHidbtS4J5iNmZgXL0Fkb
FFBjvSfpJIlJ00zbhNYS5f6GuoEDEXAMPLEBHjJnyp378OD8uTs7fLvjx79LjSTb
NYiytVbZPQUQ5Yaxu2jXnimvw3rrszlaEXAMPLE=
-----END CERTIFICATE-----\n",
"keyPair": {
"PublicKey": "-----BEGIN PUBLIC KEY-----\nMIIBIjANBgkqhkEXAMPLEQEFAAOCAQ8AMIIBCgKCAQEAEXAMPLE1nnyJwKSMHw4h\nMMEXAMPLEuuN/dMAS3fyce8DW/4+EXAMPLEyjmoF/YVF/gHr99VEEXAMPLE5VF13\n59VK7cEXAMPLE67GK+y+jikqXOgHh/xJTwo+sGpWEXAMPLEDz18xOd2ka4tCzuWEXAMPLEahJbYkCPUBSU8opVkR7qkEXAMPLE1DR6sx2HocliOOLtu6Fkw91swQWEXAMPLE\GB3ZPrNh0PzQYvjUStZeccyNCx2EXAMPLEvp9mQOUXP6plfgxwKRX2fEXAMPLEDa\nhJLXkX3rHU2xbxJSq7D+XEXAMPLEcw+LyFhI5mgFRl88eGdsAEXAMPLElnI9EesG\nFQIDAQAB\n-----END PUBLIC KEY-----\n",
"PrivateKey": "-----BEGIN RSA PRIVATE KEY-----\nkey omittted for security reasons\n-----END RSA PRIVATE KEY-----\n"
}
}

ポリシーを作成する

まずポリシードキュメントを作成します。お試しなのでフルオープンですのでお気をつけください。

policy.json
{
"Version": "2012-10-17",
"Statement": [
{
"Effect": "Allow",
"Action": [
"iot:*"
],
"Resource": [
"*"
]
}
]
}

次にポリシーを作成します。

aws iot create-policy --policy-name Policy001 --policy-document file://policy.json

証明書にポリシーをアタッチする

コマンド一発。証明書のARNは先の手順で取得したものです。

aws iot attach-policy --policy-name Policy001 --target "{証明書のARN}"

証明書にモノをアタッチする

こちらもコマンド一発。証明書のARNは先の手順で取得したものです。

aws iot attach-thing-principal --thing-name Thing001 --principal "{証明書のARN}"

送信側のプログラムを作成する

https://aws.amazon.com/jp/premiumsupport/knowledge-center/iot-core-publish-mqtt-messages-python/ にあるサンプルを使います。

AWS IoT SDK for Python v2のインストール

pip install awsiotsdk

ソースコードの変更

変数名内容
ENDPOINT*1で取得できます
CLIENT_IDモノの名前(Thing001)
PATH_TO_CERTCERTのファイルパス(Cert001.cert.pem)
PATH_TO_KEYプライベートキーのファイルパス(Cert001.private.key)
PATH_TO_ROOTここのAmazonルートCA 1をダウンロード

*1 aws iot describe-endpoint --endpoint-type iot:Data-ATSコマンド

実行結果

20回送信したら終了します。

Connecting to xxxxxxxxxxxxxx-ats.iot.ap-northeast-1.amazonaws.com with client ID 'Thing001'...
Connected!
Begin Publish
Published: '{"message": "Hello World [1]"}' to the topic: 'test/testing'
Published: '{"message": "Hello World [2]"}' to the topic: 'test/testing'
Published: '{"message": "Hello World [3]"}' to the topic: 'test/testing'
Published: '{"message": "Hello World [4]"}' to the topic: 'test/testing'
Published: '{"message": "Hello World [5]"}' to the topic: 'test/testing'
Published: '{"message": "Hello World [6]"}' to the topic: 'test/testing'
Published: '{"message": "Hello World [7]"}' to the topic: 'test/testing'
Published: '{"message": "Hello World [8]"}' to the topic: 'test/testing'
Published: '{"message": "Hello World [9]"}' to the topic: 'test/testing'
Published: '{"message": "Hello World [11]"}' to the topic: 'test/testing'
Published: '{"message": "Hello World [12]"}' to the topic: 'test/testing'
Published: '{"message": "Hello World [13]"}' to the topic: 'test/testing'
Published: '{"message": "Hello World [14]"}' to the topic: 'test/testing'
Published: '{"message": "Hello World [15]"}' to the topic: 'test/testing'
Published: '{"message": "Hello World [16]"}' to the topic: 'test/testing'
Published: '{"message": "Hello World [17]"}' to the topic: 'test/testing'
Published: '{"message": "Hello World [18]"}' to the topic: 'test/testing'
Published: '{"message": "Hello World [19]"}' to the topic: 'test/testing'
Published: '{"message": "Hello World [20]"}' to the topic: 'test/testing'
Publish End

Azureの手順

Azure CLIにエクステンションを追加する

一部エクステンションが必要なコマンドがあるため、azure-iotエクステンションをインストールします。

az extension add --name azure-iot

リソース グループを作成する

IoT部分とは直接関係ありませんが、Azureの場合は必ずリソースグループが必要です。

az group create --name iot-resource-group --location japaneast

IoT Hubを作成する

コマンド一発。お試しなのでSKUはF1(無料)としてます。

az iot hub create --name iot-hub-00001 --resource-group iot-resource-group --partition-count 2 --sku F1

デバイスを作成する

コマンド一発

az iot hub device-identity create --hub-name iot-hub-00001 --device-id Device001

送信側のプログラムを作成する

https://github.com/Azure-Samples/azure-iot-samples-python/blob/master/iot-hub/Quickstarts/simulated-device/SimulatedDevice.py にあるサンプルを使います。

IoT Hub Device SDKのインストール

pip install azure-iot-device

ソースコードの変更

変数名内容
CONNECTION_STRING*2で取得できます

*2 az iot hub device-identity connection-string show --hub-name iot-hub-00001 --device-id Device001コマンド

実行結果

無限に続きます

IoT Hub Quickstart #1 - Simulated device
Press Ctrl-C to exit
IoT Hub device sending periodic messages, press Ctrl-C to exit
Sending message: {"temperature": 22.73671571030419,"humidity": 65.13300283503716}
Message successfully sent
Sending message: {"temperature": 21.122891449050375,"humidity": 75.35478976197727}
Message successfully sent
Sending message: {"temperature": 30.11015190710952,"humidity": 79.1313503131281}
Message successfully sent
Sending message: {"temperature": 29.056883680577876,"humidity": 74.9253608733604}
Message successfully sent
Sending message: {"temperature": 30.35374671931261,"humidity": 73.57241118544626}
Message successfully sent
Sending message: {"temperature": 33.336413834339076,"humidity": 65.31133008367256}
Message successfully sent
Sending message: {"temperature": 34.92260215374919,"humidity": 69.53101153342156}
Message successfully sent

確認方法について

AWSとAzureでメッセージが届いたか確認する方法が違ったので、紹介します。

AWSの場合

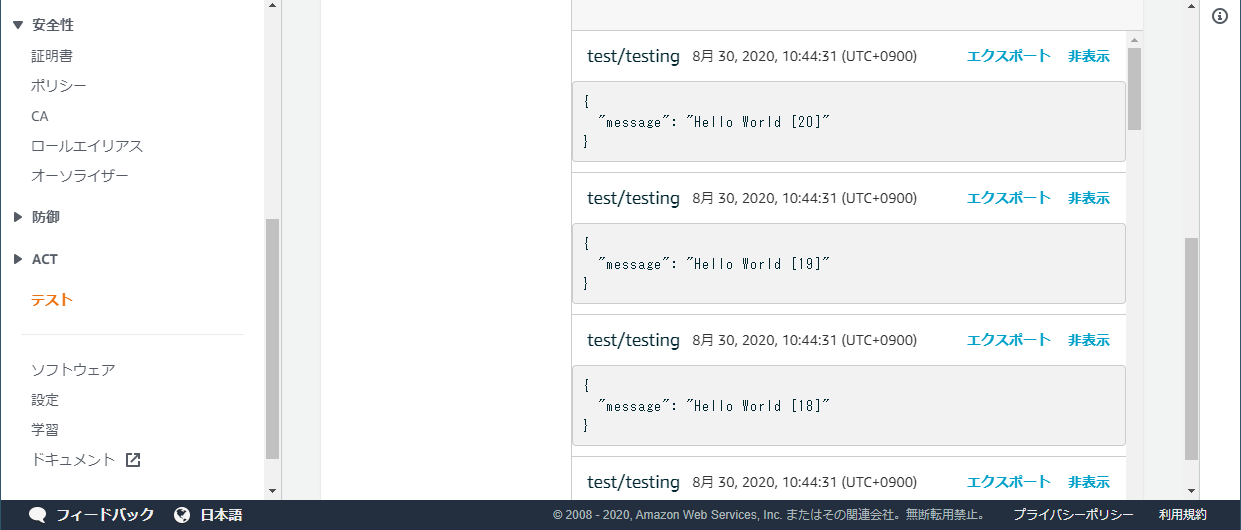
マネジメントコンソールのテストで確認できます。

image.png

Azureの場合

CLIコマンドで確認できます。

az iot hub monitor-events --hub-name iot-hub-00001 --device-id Device001
Starting event monitor, filtering on device: Device001, use ctrl-c to stop...
{
"event": {
"origin": "Device001",
"module": "",
"interface": "",
"component": "",
"payload": "{\"temperature\": 24.86829506815134,\"humidity\": 62.82101201700818}"
}
}
{
"event": {
"origin": "Device001",
"module": "",
"interface": "",
"component": "",
"payload": "{\"temperature\": 27.671191300371653,\"humidity\": 70.30860685264159}"
}
}
{
"event": {
"origin": "Device001",
"module": "",
"interface": "",
"component": "",
"payload": "{\"temperature\": 22.581311567865644,\"humidity\": 66.70979111038993}"
}
}
Stopping event monitor...

おしまい。

· 約7分
moritalous
お知らせ

過去にQiitaに投稿した内容のアーカイブです。

同じARMというだけですが、Graviton2搭載のEC2とRaspberry Pi 4でunixbenchしてみました。 https://github.com/kdlucas/byte-unixbench

スペックGraviton2 EC2Raspberry Pi 4
インスタンスタイプc6g.xlarge(コンピューティング最適化)-
CPUGravition2Broadcom BCM2711
CPU(クロック)2.5 GHz1.5GHz
CPU(コア)44
メモリ8GB8GB
ディスク汎用SSD 8GiBmicroSD 32GiB
OSAmazon Linux 2Raspberry Pi OS(64bit)

コア数とメモリ容量を合わせるためc6g.xlargeインスタンスを選択しました。 クロック数が結構違いますね。

結果

テストGraviton2 EC2Raspberry Pi 4
running 1 parallel copy of tests1711.0348.9
running 4 parallel copies of tests4204.2954.8
結果(Graviton2 EC2)
   BYTE UNIX Benchmarks (Version 5.1.3)

System: ip-172-31-24-63.ap-northeast-1.compute.internal: GNU/Linux
OS: GNU/Linux -- 4.14.186-146.268.amzn2.aarch64 -- #1 SMP Tue Jul 14 18:17:02 UTC 2020
Machine: aarch64 (aarch64)
Language: en_US.utf8 (charmap="UTF-8", collate="UTF-8")
13:58:30 up 7 min, 1 user, load average: 0.42, 0.13, 0.04; runlevel 2020-08-26

------------------------------------------------------------------------
Benchmark Run: Wed Aug 26 2020 13:58:30 - 14:26:28
4 CPUs in system; running 1 parallel copy of tests

Dhrystone 2 using register variables 41225693.4 lps (10.0 s, 7 samples)
Double-Precision Whetstone 5930.3 MWIPS (9.6 s, 7 samples)
Execl Throughput 6945.2 lps (30.0 s, 2 samples)
File Copy 1024 bufsize 2000 maxblocks 1024476.6 KBps (30.0 s, 2 samples)
File Copy 256 bufsize 500 maxblocks 285037.5 KBps (30.0 s, 2 samples)
File Copy 4096 bufsize 8000 maxblocks 2920798.7 KBps (30.0 s, 2 samples)
Pipe Throughput 1785412.0 lps (10.0 s, 7 samples)
Pipe-based Context Switching 137584.6 lps (10.0 s, 7 samples)
Process Creation 10991.4 lps (30.0 s, 2 samples)
Shell Scripts (1 concurrent) 9165.4 lpm (60.0 s, 2 samples)
Shell Scripts (8 concurrent) 2545.4 lpm (60.0 s, 2 samples)
System Call Overhead 1731853.4 lps (10.0 s, 7 samples)

System Benchmarks Index Values BASELINE RESULT INDEX
Dhrystone 2 using register variables 116700.0 41225693.4 3532.6
Double-Precision Whetstone 55.0 5930.3 1078.2
Execl Throughput 43.0 6945.2 1615.2
File Copy 1024 bufsize 2000 maxblocks 3960.0 1024476.6 2587.1
File Copy 256 bufsize 500 maxblocks 1655.0 285037.5 1722.3
File Copy 4096 bufsize 8000 maxblocks 5800.0 2920798.7 5035.9
Pipe Throughput 12440.0 1785412.0 1435.2
Pipe-based Context Switching 4000.0 137584.6 344.0
Process Creation 126.0 10991.4 872.3
Shell Scripts (1 concurrent) 42.4 9165.4 2161.6
Shell Scripts (8 concurrent) 6.0 2545.4 4242.3
System Call Overhead 15000.0 1731853.4 1154.6
========
System Benchmarks Index Score 1711.0

------------------------------------------------------------------------
Benchmark Run: Wed Aug 26 2020 14:26:28 - 14:54:24
4 CPUs in system; running 4 parallel copies of tests

Dhrystone 2 using register variables 164931718.6 lps (10.0 s, 7 samples)
Double-Precision Whetstone 23713.5 MWIPS (9.6 s, 7 samples)
Execl Throughput 19361.7 lps (30.0 s, 2 samples)
File Copy 1024 bufsize 2000 maxblocks 1063484.1 KBps (30.0 s, 2 samples)
File Copy 256 bufsize 500 maxblocks 299432.0 KBps (30.0 s, 2 samples)
File Copy 4096 bufsize 8000 maxblocks 2984459.9 KBps (30.0 s, 2 samples)
Pipe Throughput 7148051.0 lps (10.0 s, 7 samples)
Pipe-based Context Switching 1322151.5 lps (10.0 s, 7 samples)
Process Creation 35507.0 lps (30.0 s, 2 samples)
Shell Scripts (1 concurrent) 21132.9 lpm (60.0 s, 2 samples)
Shell Scripts (8 concurrent) 3038.7 lpm (60.0 s, 2 samples)
System Call Overhead 4935484.7 lps (10.0 s, 7 samples)

System Benchmarks Index Values BASELINE RESULT INDEX
Dhrystone 2 using register variables 116700.0 164931718.6 14133.0
Double-Precision Whetstone 55.0 23713.5 4311.5
Execl Throughput 43.0 19361.7 4502.7
File Copy 1024 bufsize 2000 maxblocks 3960.0 1063484.1 2685.6
File Copy 256 bufsize 500 maxblocks 1655.0 299432.0 1809.3
File Copy 4096 bufsize 8000 maxblocks 5800.0 2984459.9 5145.6
Pipe Throughput 12440.0 7148051.0 5746.0
Pipe-based Context Switching 4000.0 1322151.5 3305.4
Process Creation 126.0 35507.0 2818.0
Shell Scripts (1 concurrent) 42.4 21132.9 4984.2
Shell Scripts (8 concurrent) 6.0 3038.7 5064.5
System Call Overhead 15000.0 4935484.7 3290.3
========
System Benchmarks Index Score 4204.2
結果(Raspberry Pi 4)
   BYTE UNIX Benchmarks (Version 5.1.3)

System: raspberrypi: GNU/Linux
OS: GNU/Linux -- 5.4.51-v8+ -- #1333 SMP PREEMPT Mon Aug 10 16:58:35 BST 2020
Machine: aarch64 (unknown)
Language: en_US.utf8 (charmap="ANSI_X3.4-1968", collate="ANSI_X3.4-1968")
14:43:43 up 4 days, 11:40, 4 users, load average: 0.25, 0.43, 0.34; runlevel Aug

------------------------------------------------------------------------
Benchmark Run: Wed Aug 26 2020 14:43:43 - 15:11:31
4 CPUs in system; running 1 parallel copy of tests

Dhrystone 2 using register variables 15215662.4 lps (10.0 s, 7 samples)
Double-Precision Whetstone 2548.0 MWIPS (9.2 s, 7 samples)
Execl Throughput 1611.0 lps (30.0 s, 2 samples)
File Copy 1024 bufsize 2000 maxblocks 99063.1 KBps (30.0 s, 2 samples)
File Copy 256 bufsize 500 maxblocks 29139.6 KBps (30.0 s, 2 samples)
File Copy 4096 bufsize 8000 maxblocks 291775.2 KBps (30.0 s, 2 samples)
Pipe Throughput 270717.1 lps (10.0 s, 7 samples)
Pipe-based Context Switching 47508.6 lps (10.0 s, 7 samples)
Process Creation 2797.1 lps (30.0 s, 2 samples)
Shell Scripts (1 concurrent) 2815.6 lpm (60.0 s, 2 samples)
Shell Scripts (8 concurrent) 657.8 lpm (60.1 s, 2 samples)
System Call Overhead 233131.0 lps (10.0 s, 7 samples)

System Benchmarks Index Values BASELINE RESULT INDEX
Dhrystone 2 using register variables 116700.0 15215662.4 1303.8
Double-Precision Whetstone 55.0 2548.0 463.3
Execl Throughput 43.0 1611.0 374.6
File Copy 1024 bufsize 2000 maxblocks 3960.0 99063.1 250.2
File Copy 256 bufsize 500 maxblocks 1655.0 29139.6 176.1
File Copy 4096 bufsize 8000 maxblocks 5800.0 291775.2 503.1
Pipe Throughput 12440.0 270717.1 217.6
Pipe-based Context Switching 4000.0 47508.6 118.8
Process Creation 126.0 2797.1 222.0
Shell Scripts (1 concurrent) 42.4 2815.6 664.1
Shell Scripts (8 concurrent) 6.0 657.8 1096.4
System Call Overhead 15000.0 233131.0 155.4
========
System Benchmarks Index Score 348.9

------------------------------------------------------------------------
Benchmark Run: Wed Aug 26 2020 15:11:31 - 15:39:21
4 CPUs in system; running 4 parallel copies of tests

Dhrystone 2 using register variables 60352336.5 lps (10.0 s, 7 samples)
Double-Precision Whetstone 10173.2 MWIPS (9.2 s, 7 samples)
Execl Throughput 4667.7 lps (29.9 s, 2 samples)
File Copy 1024 bufsize 2000 maxblocks 241446.5 KBps (30.0 s, 2 samples)
File Copy 256 bufsize 500 maxblocks 69320.4 KBps (30.0 s, 2 samples)
File Copy 4096 bufsize 8000 maxblocks 626527.5 KBps (30.0 s, 2 samples)
Pipe Throughput 1073258.4 lps (10.0 s, 7 samples)
Pipe-based Context Switching 175098.6 lps (10.0 s, 7 samples)
Process Creation 6117.2 lps (30.0 s, 2 samples)
Shell Scripts (1 concurrent) 5161.1 lpm (60.0 s, 2 samples)
Shell Scripts (8 concurrent) 892.0 lpm (60.2 s, 2 samples)
System Call Overhead 906068.3 lps (10.0 s, 7 samples)

System Benchmarks Index Values BASELINE RESULT INDEX
Dhrystone 2 using register variables 116700.0 60352336.5 5171.6
Double-Precision Whetstone 55.0 10173.2 1849.7
Execl Throughput 43.0 4667.7 1085.5
File Copy 1024 bufsize 2000 maxblocks 3960.0 241446.5 609.7
File Copy 256 bufsize 500 maxblocks 1655.0 69320.4 418.9
File Copy 4096 bufsize 8000 maxblocks 5800.0 626527.5 1080.2
Pipe Throughput 12440.0 1073258.4 862.7
Pipe-based Context Switching 4000.0 175098.6 437.7
Process Creation 126.0 6117.2 485.5
Shell Scripts (1 concurrent) 42.4 5161.1 1217.2
Shell Scripts (8 concurrent) 6.0 892.0 1486.7
System Call Overhead 15000.0 906068.3 604.0
========
System Benchmarks Index Score 954.8

ということで、正解は4.4~4.9個分でした。 CPUクロック以上に性能差がありそうですね。

Raspberry Pi 4のCPU温度

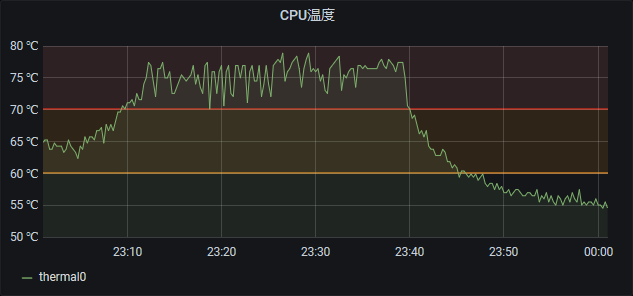
ベンチマーク中のRaspberry Pi 4のCPU温度は77℃ぐらいまで上がりました。 (ヒートシンク付き、オフィシャルケースの蓋を開けた状態)

image.png

参考

https://aws.amazon.com/jp/ec2/instance-types/ https://www.raspberrypi.org/products/raspberry-pi-4-model-b/specifications/

· 約2分
moritalous
お知らせ

過去にQiitaに投稿した内容のアーカイブです。

Raspberry Pi4が熱い。やけどしそうです。 CPU温度をGrafanaで可視化してみます。

  • 2020/8/16時点のRaspberry Pi OSはDebian Busterがベース
  • Busterのリポジトリに登録されているprometheus-node-exporterのバージョンは0.17.0。
  • Busterの次のバージョンBullseyeのリポジトリにはバージョン1.0.1があり、これを使うとCPU温度の値が取れる

PrometheusとGrafanaのインストールについては、以前書いた「PrometheusとGrafanaでRaspberry Piを監視」を参照ください。

バージョン1.0.1のprometheus-node-exporterをインストール

  1. https://www.debian.org/distrib/packages#search_packages でprometheus-node-exporterを検索
  2. 検索結果のprometheus-node-exporter パッケージbullseye (testing)をクリック
  3. ページ下部にあるprometheus-node-exporter のダウンロードのarm64かarmhfを選択
  4. ftp.jp.debian.orgで始まるリンクをクリックし、debパッケージをダウンロード
  5. sudo dpkg -i prometheus-node-exporter_[バージョン]_[アーキテクチャ].debでインストール

Grafanaで可視化

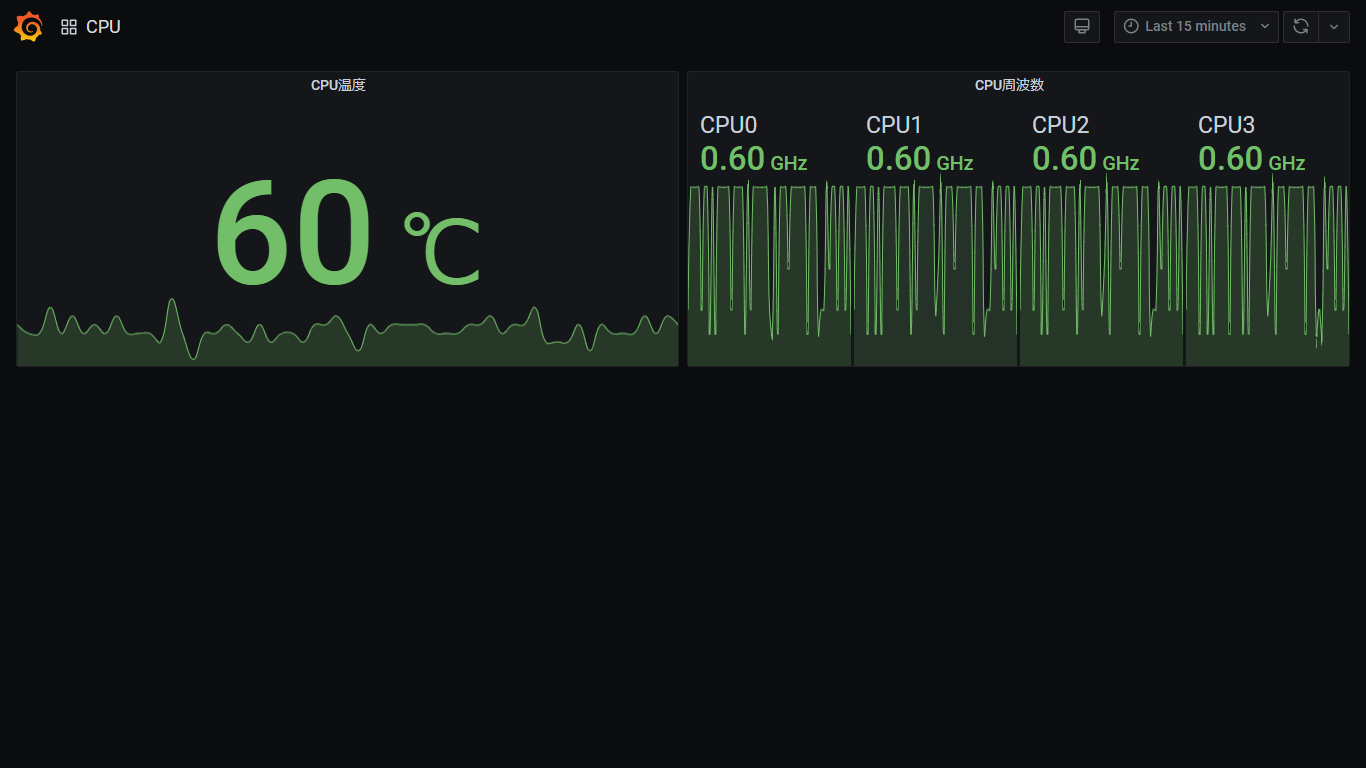
CPU温度はnode_thermal_zone_tempというメトリクスで取得されています。 私はCPUの周波数と合わせて、こんな感じで可視化してみました。

スクリーンショット (175).png

熱い