メインコンテンツまでスキップ

· 約3分
moritalous
お知らせ

過去にQiitaに投稿した内容のアーカイブです。

自分用の構築メモです。

VirtualBox の設定

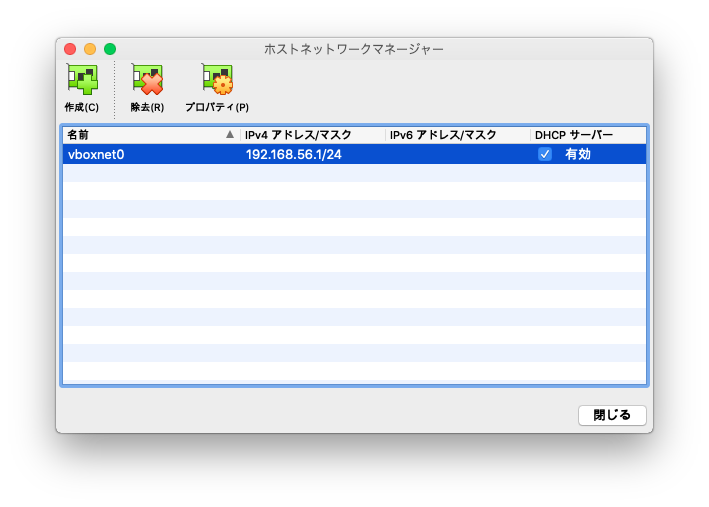
  1. ホストネットワークマネージャーを作成する
    Untitled.png

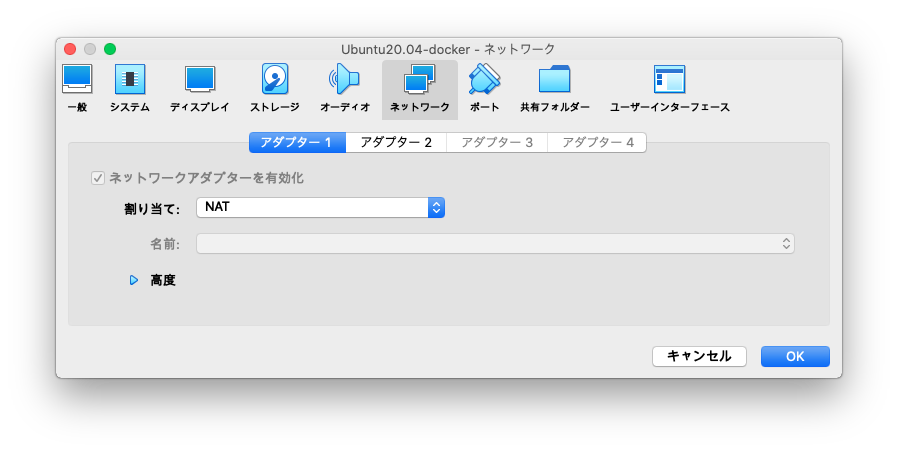
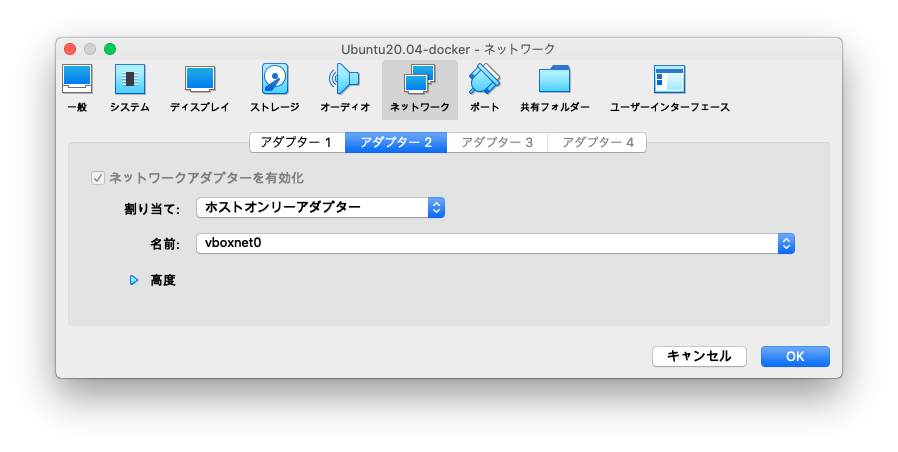
  2. 仮想マシンを作成する際にNICをNATホストオンリーアダプターの2つ設定する
    Untitled (1).png Untitled (2).png

  3. Ubuntu Server 20.04をインストール
    インストールが始まったら、NICを2つとも切断するとUpdateが失敗するのでインストールが早く終る

Ubuntuの設定

  1. SSHの設定
Ubuntu
sudo sed -i 's/#PubkeyAuthentication/PubkeyAuthentication/g' /etc/ssh/sshd_config
sudo sed -i 's/#AuthorizedKeysFile/AuthorizedKeysFile/g' /etc/ssh/sshd_config
sudo systemctl restart sshd.service

ssh-keygen -t rsa -b 4096 -C "moritalous"
cat ~/.ssh/id_rsa.pub >> ~/.ssh/authorized_keys
  1. Dockerインストール
Ubuntu
curl -fsSL https://get.docker.com -o get-docker.sh && \
sudo sh ./get-docker.sh && \
sudo usermod -aG docker $USER
  1. VirtualBoxゲストツールインストール
Ubuntu
sudo apt update && \
sudo apt install -y virtualbox-guest-dkms virtualbox-guest-utils && \
sudo usermod -aG vboxsf $USER

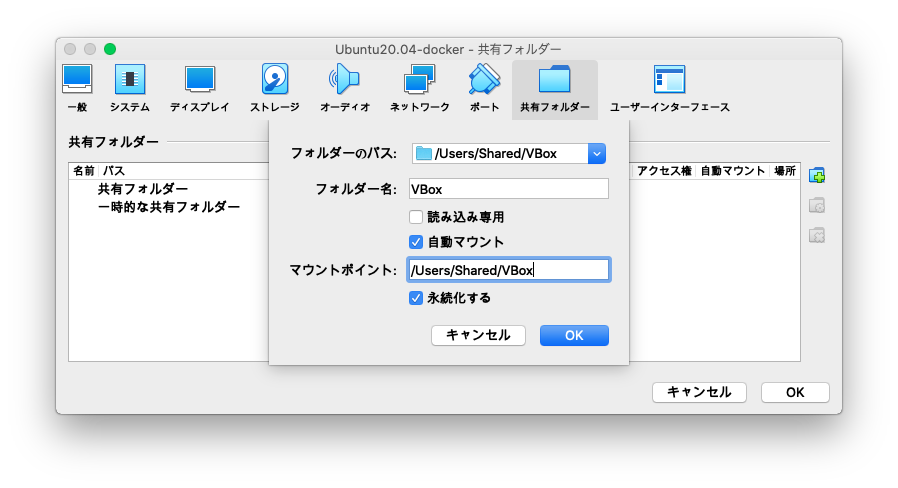
## macと同じパスで共有するため
sudo mkdir -p /Users/Shared/VBox
スクリーンショット 2021-10-10 21.38.21 (1).png

macの設定

  1. 鍵でSSHログインする設定
~/.ssh/config
Host Ubuntu-VirtualBox-Docker
HostName xxx.xxx.xxx.xxx
User ubuntu
IdentityFile ~/.ssh/xxxxxxxxxx/id_rsa
  1. Docker Clientをインストール
mac
curl https://download.docker.com/mac/static/stable/x86_64/docker-20.10.9.tgz -o docker-20.10.9.tgz
tar xzvf docker-20.10.9.tgz
sudo xattr -rc docker
mkdir ~/bin
cp -rf docker/* ~/bin/
echo 'export PATH=$PATH:~/bin' >> ~/.zshrc

docker context create vbox --docker "host=ssh://ubuntu@Ubuntu-VirtualBox-Docker"
docker context use vbox

VSCodeの.devcontainerの設定

  • workspaceFolderを追加
  • workspaceMountを追加
  • mountsを追加
  • remoteUserを削除(rootで動くようにする)
.devcontainer
// For format details, see https://aka.ms/devcontainer.json. For config options, see the README at:
// https://github.com/microsoft/vscode-dev-containers/tree/v0.202.1/containers/ubuntu
{
"name": "Ubuntu",
"runArgs": ["--init"],
"build": {
"dockerfile": "Dockerfile",
// Update 'VARIANT' to pick an Ubuntu version: hirsute, focal, bionic
// Use hirsute or bionic on local arm64/Apple Silicon.
"args": { "VARIANT": "focal" }
},
// ここから追加
"workspaceFolder": "/workspace",
"workspaceMount": "source=workspace,target=/workspace,type=volume",

"mounts": [
"source=/Users/Shared/VBox,target=/workspace/VBox,type=bind,consistency=cached"
],
// ここまで追加
// Set *default* container specific settings.json values on container create.
"settings": {},


// Add the IDs of extensions you want installed when the container is created.
// "extensions": [],
"extensions": []

// Use 'forwardPorts' to make a list of ports inside the container available locally.
// "forwardPorts": [],

// Use 'postCreateCommand' to run commands after the container is created.
// "postCreateCommand": "uname -a",

// Comment out connect as root instead. More info: https://aka.ms/vscode-remote/containers/non-root.
// rootユーザーで動かす
// "remoteUser": "vscode"
// rootユーザーで動かす
}

VirtualBoxの起動(コマンドラインでヘッドレス)

mac
VBoxManage startvm Ubuntu20.04-docker --type headless
· 約4分
moritalous
お知らせ

過去にQiitaに投稿した内容のアーカイブです。

Docker Desktop問題をこちらの記事を参考に対応してました。 https://qiita.com/ohtsuka1317/items/617a865b8a9d4fb67989

私の環境だけかもしれませんが、Dockerコンテナ内で名前解決がうまくいきませんでしたので応急処置的な対処方法です。

Dockerデーモン起動

WSL2
sudo /etc/init.d/docker start

Ubuntuイメージを取得して起動、Bashに接続

WSL2
docker run -it ubuntu:latest bash

apt updateしてみる

Ubuntuコンテナ
root@6babda3e1bb7:/# apt update
Err:1 http://archive.ubuntu.com/ubuntu focal InRelease
Temporary failure resolving 'archive.ubuntu.com'
Err:2 http://security.ubuntu.com/ubuntu focal-security InRelease
Temporary failure resolving 'security.ubuntu.com'
Err:3 http://archive.ubuntu.com/ubuntu focal-updates InRelease
Temporary failure resolving 'archive.ubuntu.com'
Err:4 http://archive.ubuntu.com/ubuntu focal-backports InRelease
Temporary failure resolving 'archive.ubuntu.com'
Reading package lists... Done
Building dependency tree
Reading state information... Done
All packages are up to date.
W: Failed to fetch http://archive.ubuntu.com/ubuntu/dists/focal/InRelease Temporary failure resolving 'archive.ubuntu.com'
W: Failed to fetch http://archive.ubuntu.com/ubuntu/dists/focal-updates/InRelease Temporary failure resolving 'archive.ubuntu.com'
W: Failed to fetch http://archive.ubuntu.com/ubuntu/dists/focal-backports/InRelease Temporary failure resolving 'archive.ubuntu.com'
W: Failed to fetch http://security.ubuntu.com/ubuntu/dists/focal-security/InRelease Temporary failure resolving 'security.ubuntu.com'
W: Some index files failed to download. They have been ignored, or old ones used instead.
root@6babda3e1bb7:/#

名前解決ができてない模様

Ubuntuコンテナ
root@6babda3e1bb7:/# cat /etc/resolv.conf 
## This file was automatically generated by WSL. To stop automatic generation of this file, add the following entry to /etc/wsl.conf:
## [network]
## generateResolvConf = false
nameserver 172.17.48.1
root@6babda3e1bb7:/#

172.17.48.1はWSLのホストであるWindowsのIPアドレスです。

解決方法

resolv.confを上書きしちゃう

Ubuntuコンテナ
echo 'nameserver 8.8.8.8' | tee /etc/resolv.conf
root@6babda3e1bb7:/# apt update
Get:1 http://security.ubuntu.com/ubuntu focal-security InRelease [114 kB]
Get:2 http://archive.ubuntu.com/ubuntu focal InRelease [265 kB]
Get:3 http://security.ubuntu.com/ubuntu focal-security/universe amd64 Packages [796 kB]
Get:4 http://archive.ubuntu.com/ubuntu focal-updates InRelease [114 kB]
Get:5 http://security.ubuntu.com/ubuntu focal-security/restricted amd64 Packages [581 kB]
Get:6 http://security.ubuntu.com/ubuntu focal-security/multiverse amd64 Packages [30.1 kB]
Get:7 http://security.ubuntu.com/ubuntu focal-security/main amd64 Packages [1135 kB]
Get:8 http://archive.ubuntu.com/ubuntu focal-backports InRelease [101 kB]
Get:9 http://archive.ubuntu.com/ubuntu focal/universe amd64 Packages [11.3 MB]
Get:10 http://archive.ubuntu.com/ubuntu focal/multiverse amd64 Packages [177 kB]
Get:11 http://archive.ubuntu.com/ubuntu focal/restricted amd64 Packages [33.4 kB]
Get:12 http://archive.ubuntu.com/ubuntu focal/main amd64 Packages [1275 kB]
Get:13 http://archive.ubuntu.com/ubuntu focal-updates/multiverse amd64 Packages [33.4 kB]
Get:14 http://archive.ubuntu.com/ubuntu focal-updates/main amd64 Packages [1582 kB]
Get:15 http://archive.ubuntu.com/ubuntu focal-updates/universe amd64 Packages [1084 kB]
Get:16 http://archive.ubuntu.com/ubuntu focal-updates/restricted amd64 Packages [632 kB]
Get:17 http://archive.ubuntu.com/ubuntu focal-backports/universe amd64 Packages [6310 B]
Get:18 http://archive.ubuntu.com/ubuntu focal-backports/main amd64 Packages [2668 B]
Fetched 19.3 MB in 6s (3008 kB/s)
Reading package lists... Done
Building dependency tree
Reading state information... Done
4 packages can be upgraded. Run 'apt list --upgradable' to see them.
root@6babda3e1bb7:/#

正しいやり方かどうかはわかりません。

おまけ

VSCodeのRemote - Containers拡張を使う場合は、devcontainer.jsonpostCreateCommandにでも書いておきましょう

devcontainer.json
// For format details, see https://aka.ms/devcontainer.json. For config options, see the README at:
// https://github.com/microsoft/vscode-dev-containers/tree/v0.202.1/containers/ubuntu
{
"name": "Ubuntu",
"runArgs": ["--init"],
"build": {
"dockerfile": "Dockerfile",
// Update 'VARIANT' to pick an Ubuntu version: hirsute, focal, bionic
// Use hirsute or bionic on local arm64/Apple Silicon.
"args": { "VARIANT": "focal" }
},

// Set *default* container specific settings.json values on container create.
"settings": {},


// Add the IDs of extensions you want installed when the container is created.
"extensions": [],

// Use 'forwardPorts' to make a list of ports inside the container available locally.
// "forwardPorts": [],

// Use 'postCreateCommand' to run commands after the container is created.
"postCreateCommand": "echo 'nameserver 8.8.8.8' | sudo tee /etc/resolv.conf",

// Comment out connect as root instead. More info: https://aka.ms/vscode-remote/containers/non-root.
"remoteUser": "vscode",
"features": {
}
}

· 約7分
moritalous
お知らせ

過去にQiitaに投稿した内容のアーカイブです。

2022/08/30更新 久しぶりに試すとうまく動きませんでした。修正箇所をこちらにまとめています。


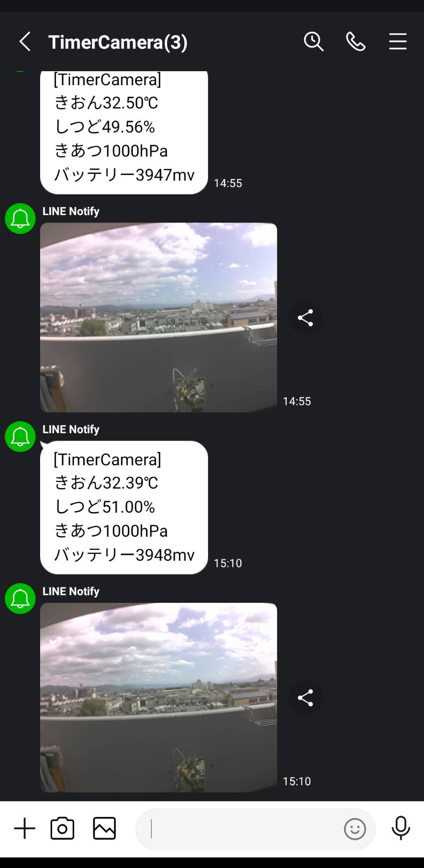
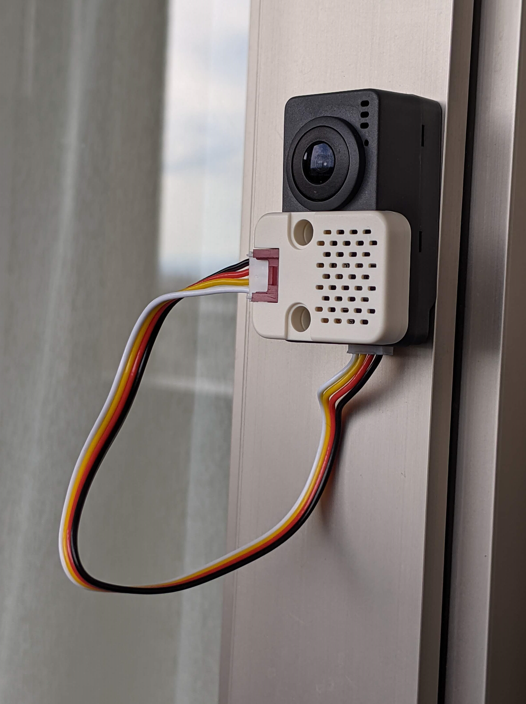
夏休みなので(?)、Timer Camera Fで定点カメラを作ってみました。そのままだと面白くないので、気温・湿度・気圧を取得してLINEに通知するようにしてみました。

image.png

Lineに定期的に通知します。

image.png

準備

ハードウェア

Timer Camera F https://docs.m5stack.com/en/unit/timercam_f

ENV II https://docs.m5stack.com/en/unit/envII

開発環境

Visual Studio Code https://code.visualstudio.com/

PlatformIO https://platformio.org/

ライブラリー

m5stack/Timer-CAM https://github.com/m5stack/TimerCam-arduino

mobizt/ESP Line Notify https://github.com/mobizt/ESP-Line-Notify

adafruit/Adafruit BMP280 Library https://github.com/adafruit/Adafruit_BMP280_Library

adafruit/Adafruit SHT31 Library https://github.com/adafruit/Adafruit_SHT31

platformio.iniはこのようになります。 upload_speedとmonitor_speedも指定が必要です。

platformio.ini
[env:m5stack-timer-cam]
platform = espressif32
board = m5stack-timer-cam
framework = arduino
lib_deps =
m5stack/Timer-CAM@^0.0.1
mobizt/ESP Line Notify@^1.0.8
adafruit/Adafruit BMP280 Library@^2.4.0
adafruit/Adafruit SHT31 Library@^2.0.0
adafruit/Adafruit BusIO@^1.8.3
adafruit/Adafruit Unified Sensor@^1.1.4
Wire@^1.0.1
upload_speed = 1500000
monitor_speed = 115200

プログラム

写真を取る

初期化

main.cpp
  camera_config_t config;
config.ledc_channel = LEDC_CHANNEL_0;
config.ledc_timer = LEDC_TIMER_0;
config.pin_d0 = Y2_GPIO_NUM;
config.pin_d1 = Y3_GPIO_NUM;
config.pin_d2 = Y4_GPIO_NUM;
config.pin_d3 = Y5_GPIO_NUM;
config.pin_d4 = Y6_GPIO_NUM;
config.pin_d5 = Y7_GPIO_NUM;
config.pin_d6 = Y8_GPIO_NUM;
config.pin_d7 = Y9_GPIO_NUM;
config.pin_xclk = XCLK_GPIO_NUM;
config.pin_pclk = PCLK_GPIO_NUM;
config.pin_vsync = VSYNC_GPIO_NUM;
config.pin_href = HREF_GPIO_NUM;
config.pin_sscb_sda = SIOD_GPIO_NUM;
config.pin_sscb_scl = SIOC_GPIO_NUM;
config.pin_pwdn = PWDN_GPIO_NUM;
config.pin_reset = RESET_GPIO_NUM;
config.xclk_freq_hz = 20000000;
config.pixel_format = PIXFORMAT_JPEG;
config.frame_size = FRAMESIZE_UXGA;
config.jpeg_quality = 10;
config.fb_count = 2;

// camera init
esp_err_t err = esp_camera_init(&config);
if (err != ESP_OK)
{
Serial.printf("Camera init failed with error 0x%x", err);
return;
}

sensor_t *s = esp_camera_sensor_get();
//initial sensors are flipped vertically and colors are a bit saturated
s->set_vflip(s, 1); //flip it back
s->set_brightness(s, 1); //up the blightness just a bit
s->set_saturation(s, -2); //lower the saturation

//drop down frame size for higher initial frame rate
s->set_framesize(s, FRAMESIZE_SXGA);

写真を取る

main.cpp
  camera_fb_t *fb = NULL;
fb = esp_camera_fb_get();

if (!fb)
{
Serial.println("Camera capture failed");
return;
}

Serial.println("capture complete");

後処理

main.cpp
  esp_camera_fb_return(fb);

スリープさせ、一定時間後に復帰させる

以下の処理を行うことで、一定時間スリープして、その後復帰するようになります。 他のM5シリーズとは違うバッテリー制御の仕組みが入っているようです。

  1. RTCにXX秒後に復帰するよう指定する
  2. バッテリー出力を止める

RTCにXX秒後に復帰するよう指定する

初期化

main.cpp
  bmm8563_init();

sleep_time秒後に復帰

main.cpp
  bmm8563_setTimerIRQ(sleep_time);

バッテリー出力を止める

初期化

main.cpp
  bat_init();

バッテリー出力を止める

main.cpp
  bat_disable_output();

(おまけ)バッテリー残量の取得(単位はmv)

main.cpp
  bat_get_voltage()

気温、湿度、気圧を取得する

気温と湿度はSHT30から、気圧はBMP280から取得します。

main.cpp
#define ENV_I2C_SDA 4
#define ENV_I2C_SCL 13

#define BM8563_I2C_SDA 12
#define BM8563_I2C_SCL 14

float tmp = 0.0;
float hum = 0.0;
float pressure = 0.0;

Adafruit_BMP280 bme = Adafruit_BMP280(&Wire);
Adafruit_SHT31 sht3x = Adafruit_SHT31(&Wire);

Wire.begin(ENV_I2C_SDA, ENV_I2C_SCL);
while (!bme.begin(0x76))
{
Serial.println("Could not find a valid BMP280 sensor, check wiring!");
}
while (!sht3x.begin(0x44))
{
Serial.println("Could not find a valid SHT3X sensor, check wiring!");
}

pressure = bme.readPressure();
tmp = sht3x.readTemperature();
hum = sht3x.readHumidity();

LINEに送る

LINE Notifyというサービスを利用して通知します。トークンが必要なので事前に取得してください。 https://notify-bot.line.me/doc/ja/

main.cpp
LineNotiFyClient line;
const char *line_token = "xxxxxxxxxxxxxxxxxxxxxxxxxxxx";

line.reconnect_wifi = true;
line.token = line_token;
line.message = "メッセージ";

line.image.data.blob = fb->buf; // 撮影した画像
line.image.data.size = fb->len; // 撮影した画像のバイト長
line.image.data.file_name = "camera.jpg";

LineNotifySendingResult result = LineNotify.send(line);

困った点

RTCとはTimer Camera F内部でI2C通信をしているようで、ENV IIのI2C通信と競合(?)して、同時に使うことができませんでした。 色々試行錯誤しましたがいい解決方法は見つからず、

  1. まずはENV IIから気象データを取得する
  2. 次にI2C通信を初期化して、RTCの処理を行う

として逃げることにしました。

ソースコード

こちらにも公開しております。 https://github.com/moritalous/TimerCamera-ENVII-LINE

main.cpp
#include <Arduino.h>
#include <WiFi.h>

#include "battery.h"
#include "led.h"
#include "bmm8563.h"

#include "esp_camera.h"
#include "camera_pins.h"

#include <ESP_Line_Notify.h>

#include <Wire.h>
#include "Adafruit_Sensor.h"
#include "Adafruit_BMP280.h"
#include "Adafruit_SHT31.h"

const char *ssid = "xxxxxxxxxx";
const char *password = "xxxxxxxxxx";

const char *line_token = "xxxxxxxxxxxxxxxxxxxx";

int sleep_time = 15 * 60;

#define ENV_I2C_SDA 4
#define ENV_I2C_SCL 13

#define BM8563_I2C_SDA 12
#define BM8563_I2C_SCL 14

float tmp = 0.0;
float hum = 0.0;
float pressure = 0.0;

Adafruit_BMP280 bme = Adafruit_BMP280(&Wire);
Adafruit_SHT31 sht3x = Adafruit_SHT31(&Wire);

LineNotiFyClient line;

String message = "";

void enterSleep()
{
Serial.println("Enter Sleep! Wake Up after " + String(sleep_time) + " Sec.");
delay(500);
Wire.begin(BM8563_I2C_SDA, BM8563_I2C_SCL);
delay(500);

bmm8563_init();
bmm8563_setTimerIRQ(sleep_time);

bat_disable_output();

esp_deep_sleep(sleep_time * 1000 * 1000);
esp_deep_sleep_start();
}

void setup()
{
Serial.begin(115200);
Serial.setDebugOutput(true);
Serial.println();

bat_init();

led_init(CAMERA_LED_GPIO);

Wire.begin(ENV_I2C_SDA, ENV_I2C_SCL);
while (!bme.begin(0x76))
{
Serial.println("Could not find a valid BMP280 sensor, check wiring!");
}
while (!sht3x.begin(0x44))
{
Serial.println("Could not find a valid SHT3X sensor, check wiring!");
}

pressure = bme.readPressure();
tmp = sht3x.readTemperature();
hum = sht3x.readHumidity();

message = "\r\nきおん" + String(tmp) + "℃\r\n" +
"しつど" + String(hum) + "%\r\n" +
"きあつ" + String((int)pressure / 100) + "hPa\r\n" +
"バッテリー" + String(bat_get_voltage()) + "mv";

camera_config_t config;
config.ledc_channel = LEDC_CHANNEL_0;
config.ledc_timer = LEDC_TIMER_0;
config.pin_d0 = Y2_GPIO_NUM;
config.pin_d1 = Y3_GPIO_NUM;
config.pin_d2 = Y4_GPIO_NUM;
config.pin_d3 = Y5_GPIO_NUM;
config.pin_d4 = Y6_GPIO_NUM;
config.pin_d5 = Y7_GPIO_NUM;
config.pin_d6 = Y8_GPIO_NUM;
config.pin_d7 = Y9_GPIO_NUM;
config.pin_xclk = XCLK_GPIO_NUM;
config.pin_pclk = PCLK_GPIO_NUM;
config.pin_vsync = VSYNC_GPIO_NUM;
config.pin_href = HREF_GPIO_NUM;
config.pin_sscb_sda = SIOD_GPIO_NUM;
config.pin_sscb_scl = SIOC_GPIO_NUM;
config.pin_pwdn = PWDN_GPIO_NUM;
config.pin_reset = RESET_GPIO_NUM;
config.xclk_freq_hz = 20000000;
config.pixel_format = PIXFORMAT_JPEG;
config.frame_size = FRAMESIZE_UXGA;
config.jpeg_quality = 10;
config.fb_count = 2;

// camera init
esp_err_t err = esp_camera_init(&config);
if (err != ESP_OK)
{
Serial.printf("Camera init failed with error 0x%x", err);
return;
}

sensor_t *s = esp_camera_sensor_get();
//initial sensors are flipped vertically and colors are a bit saturated
s->set_vflip(s, 1); //flip it back
s->set_brightness(s, 1); //up the blightness just a bit
s->set_saturation(s, -2); //lower the saturation

//drop down frame size for higher initial frame rate
s->set_framesize(s, FRAMESIZE_SXGA);

Serial.printf("Connect to %s, %s\r\n", ssid, password);

WiFi.begin(ssid, password);

int count = 0;
while (WiFi.status() != WL_CONNECTED)
{
delay(500);
Serial.print(".");
count++;
if (count > 20)
{
enterSleep();
}
}
Serial.println("");
Serial.println("WiFi connected");
}

/* Function to print the sending result via Serial */
void printRessult(LineNotifySendingResult result)
{
if (result.status == LineNotify_Sending_Success)
{
Serial.printf("Status: %s\n", "success");
Serial.printf("Text limit: %d\n", result.quota.text.limit);
Serial.printf("Text remaining: %d\n", result.quota.text.remaining);
Serial.printf("Image limit: %d\n", result.quota.image.limit);
Serial.printf("Image remaining: %d\n", result.quota.image.remaining);
Serial.printf("Reset: %d\n", result.quota.reset);
}
else if (result.status == LineNotify_Sending_Error)
{
Serial.printf("Status: %s\n", "error");
Serial.printf("error code: %d\n", result.error.code);
Serial.printf("error msg: %s\n", result.error.message.c_str());
}
}

void loop()
{
// put your main code here, to run repeatedly:

camera_fb_t *fb = NULL;
fb = esp_camera_fb_get();

if (!fb)
{
Serial.println("Camera capture failed");
return;
}

Serial.println("capture complete");

line.reconnect_wifi = true;
line.token = line_token;
line.message = message.c_str();

line.image.data.blob = fb->buf;
line.image.data.size = fb->len;
line.image.data.file_name = "camera.jpg";

Serial.println(message);

LineNotifySendingResult result = LineNotify.send(line);
printRessult(result);

esp_camera_fb_return(fb);

enterSleep();
}

· 約4分
moritalous
お知らせ

過去にQiitaに投稿した内容のアーカイブです。

M5StackのUnitV2をみて、手元のラズパイZeroでも何かできないかと思って調整してみました。

調べてみるとTensorflow Liteが動くようなので、サンプルの画像分類を試してみました。 ※ラズパイZero(ARMv6)向けのWheelパッケージは用意されていませんので、自前で作成する必要があります。手順は後ろに載せています

サンプルプログラムの実行

RaspberryPiZero
git clone https://github.com/tensorflow/examples --depth 1
cd examples/lite/examples/image_classification/raspberry_pi/
bash download.sh /tmp
python3 classify_picamera.py --model /tmp/mobilenet_v1_1.0_224_quant.tflite --labels /tmp/labels_mobilenet_quant_v1_224.txt

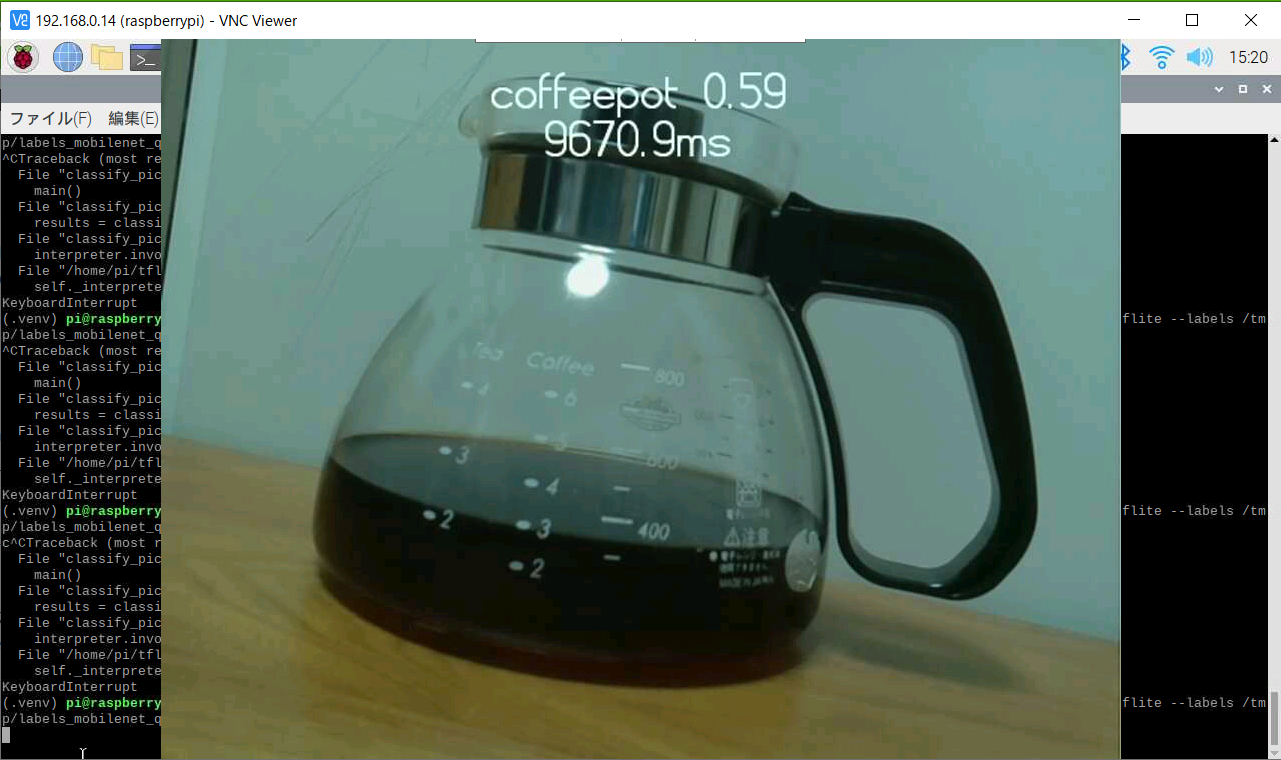
結果1(Mobilenet_V1_1.0_224_quant)

image.png

動作はするのですが、1回の推論に10秒近くかかります。。遅い。。

使用するモデルを軽いものに変えてみます。 ここの中からMobilenet_V1_1.0_128_quantに変更してみます。

RaspberryPiZero
cd /tmp/
wget https://storage.googleapis.com/download.tensorflow.org/models/mobilenet_v1_2018_08_02/mobilenet_v1_1.0_128_quant.tgz
tar zxvf mobilenet_v1_1.0_128_quant.tgz

ラベルは見つからなかったのでサンプルに含まれるものを使いまわしましょう

RaspberryPiZero
python3 classify_picamera.py   --model /tmp/mobilenet_v1_1.0_128_quant.tflite   --labels /tmp/labels_mobilenet_quant_v1_224.txt

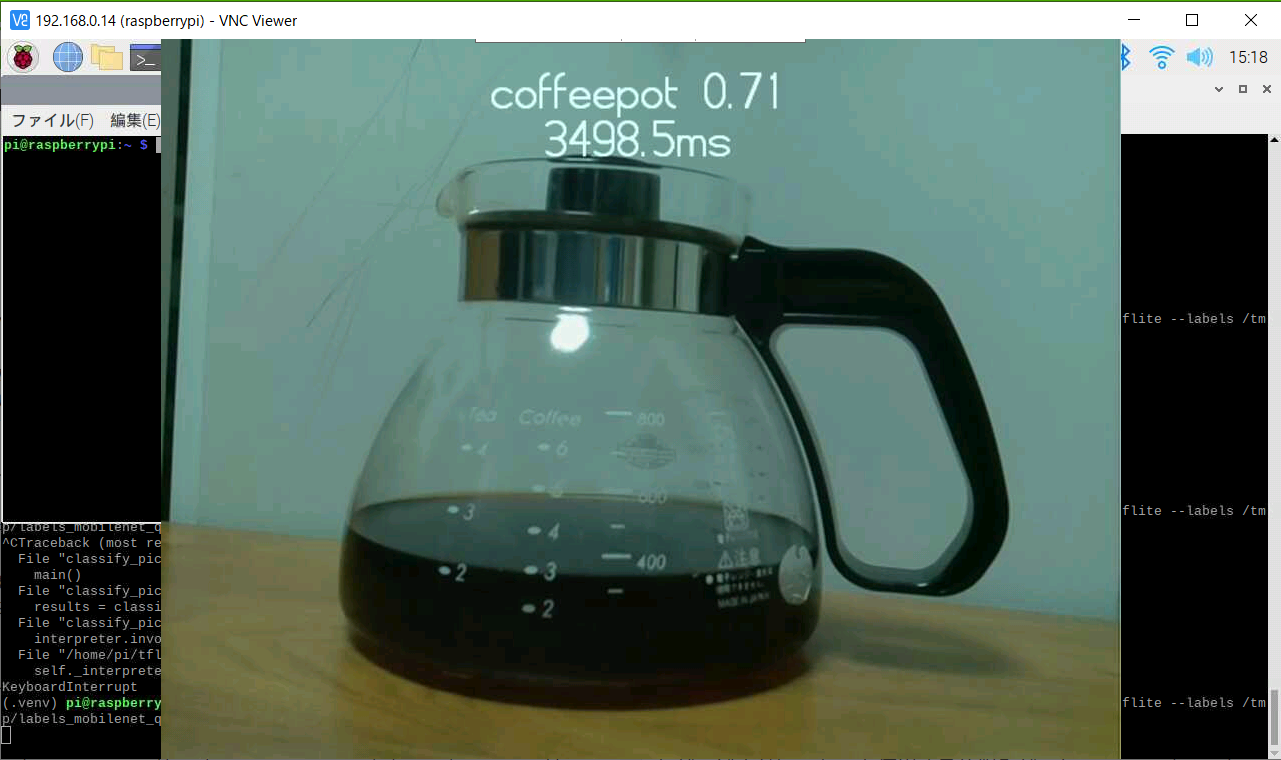
結果2(Mobilenet_V1_1.0_128_quant)

image.png

3.5秒ぐらいなので、まあまあ早くなりました。

ラズパイZero向けのPython Wheelパッケージを作成する

残念ながらラズパイZero(ARMv6)向けのWheelパッケージは用意されていません。 ラズパイ2以降のARMv7用は用意されています。 https://www.tensorflow.org/lite/guide/python

ただ、自分でビルドする手順は用意されていましたので、それに沿ってやってみました。

VSCodeでDocker in Dockerコンテナを起動

ここは好みですが、ホスト環境を汚さずビルドしたかったので、Docker内で行おうと思いました。 ただ、ビルドにDokcerを使用する仕組みだったので、Dockerの中でDockerが起動可能な「Docker in Docker」の形で行いました。

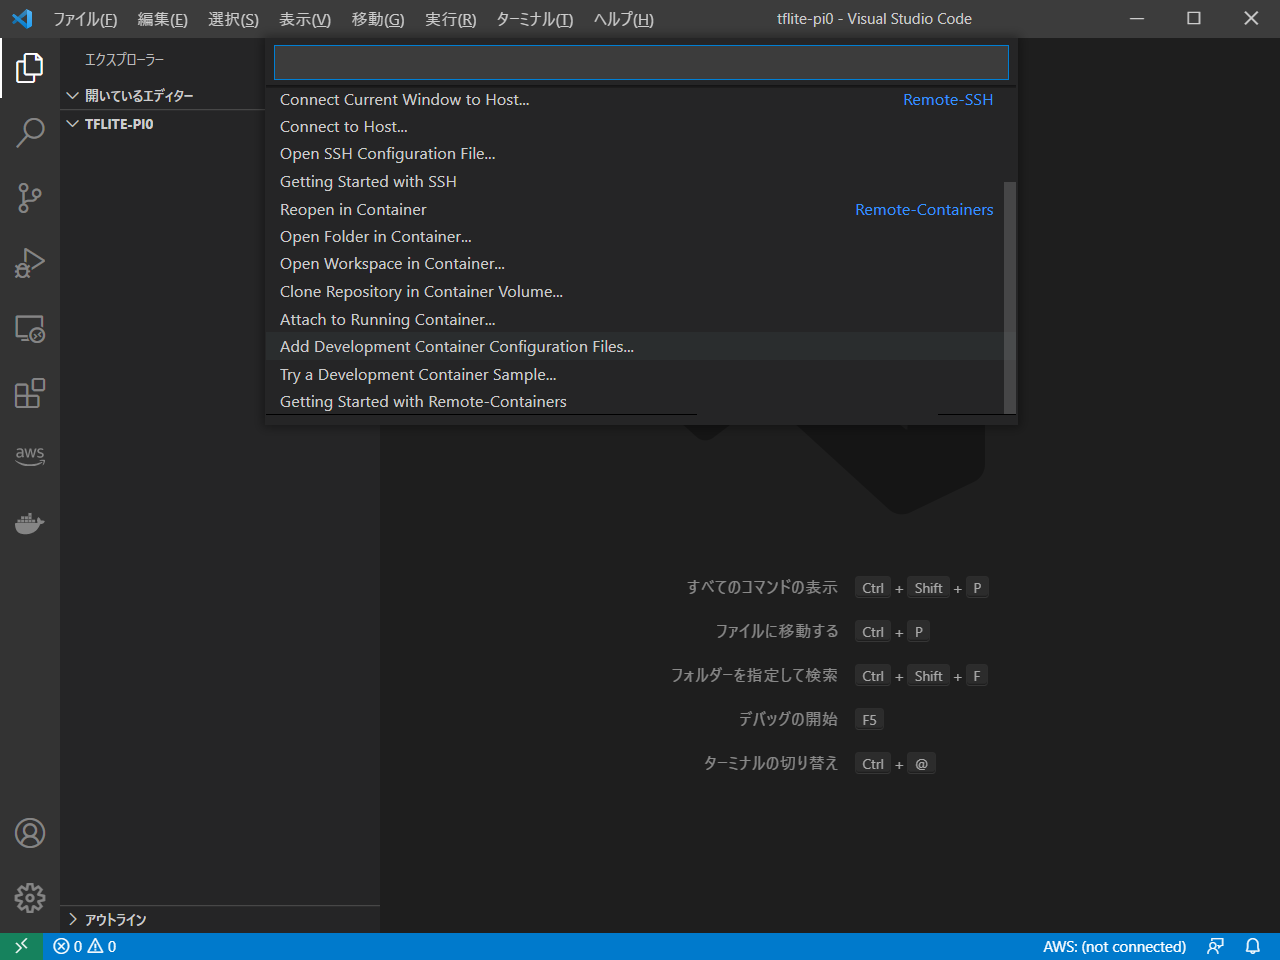
vscodeを起動し、左下の「リモートウィンドウを開きます」ボタンから始めます

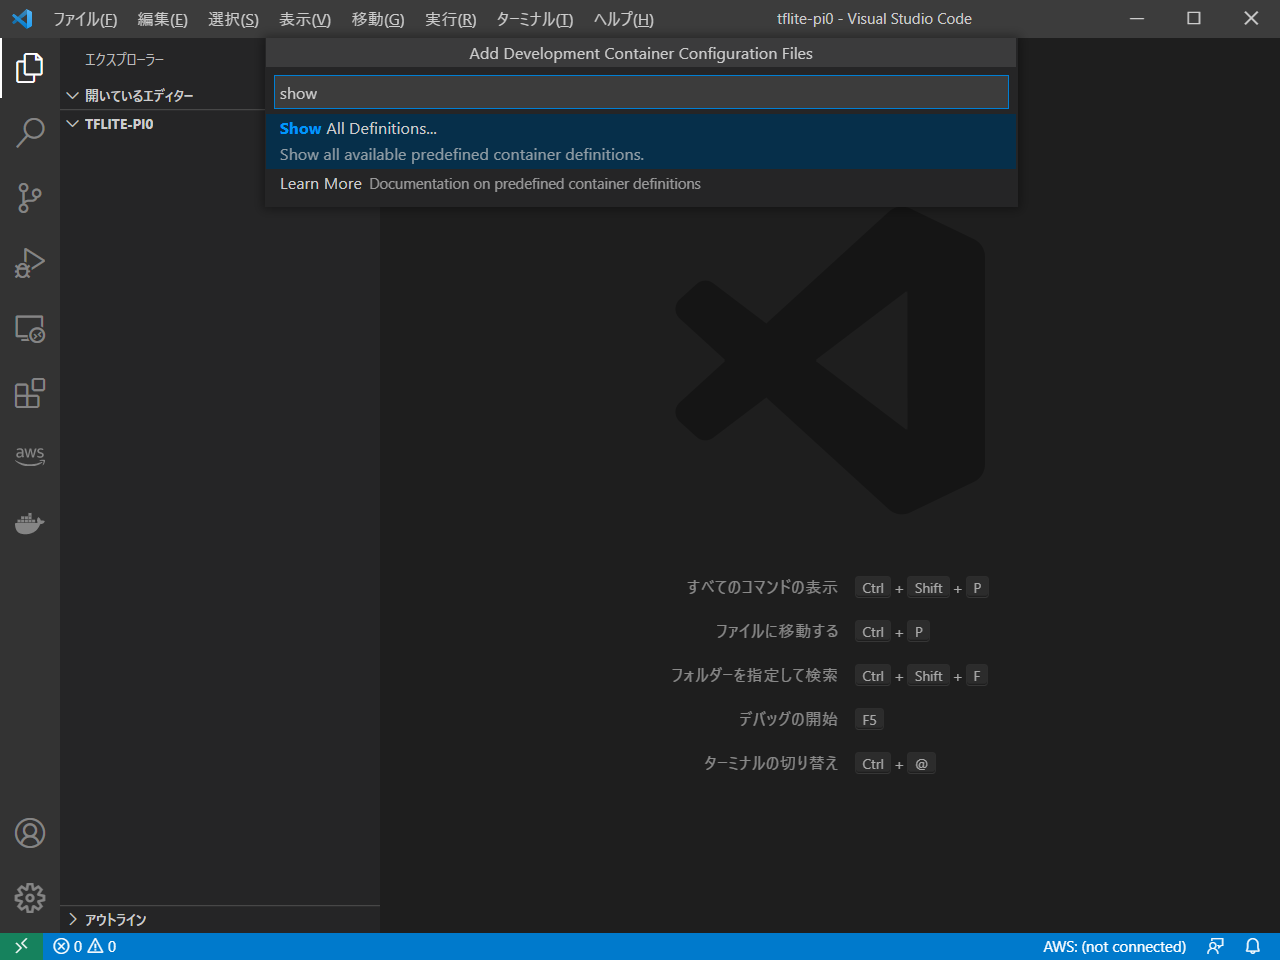
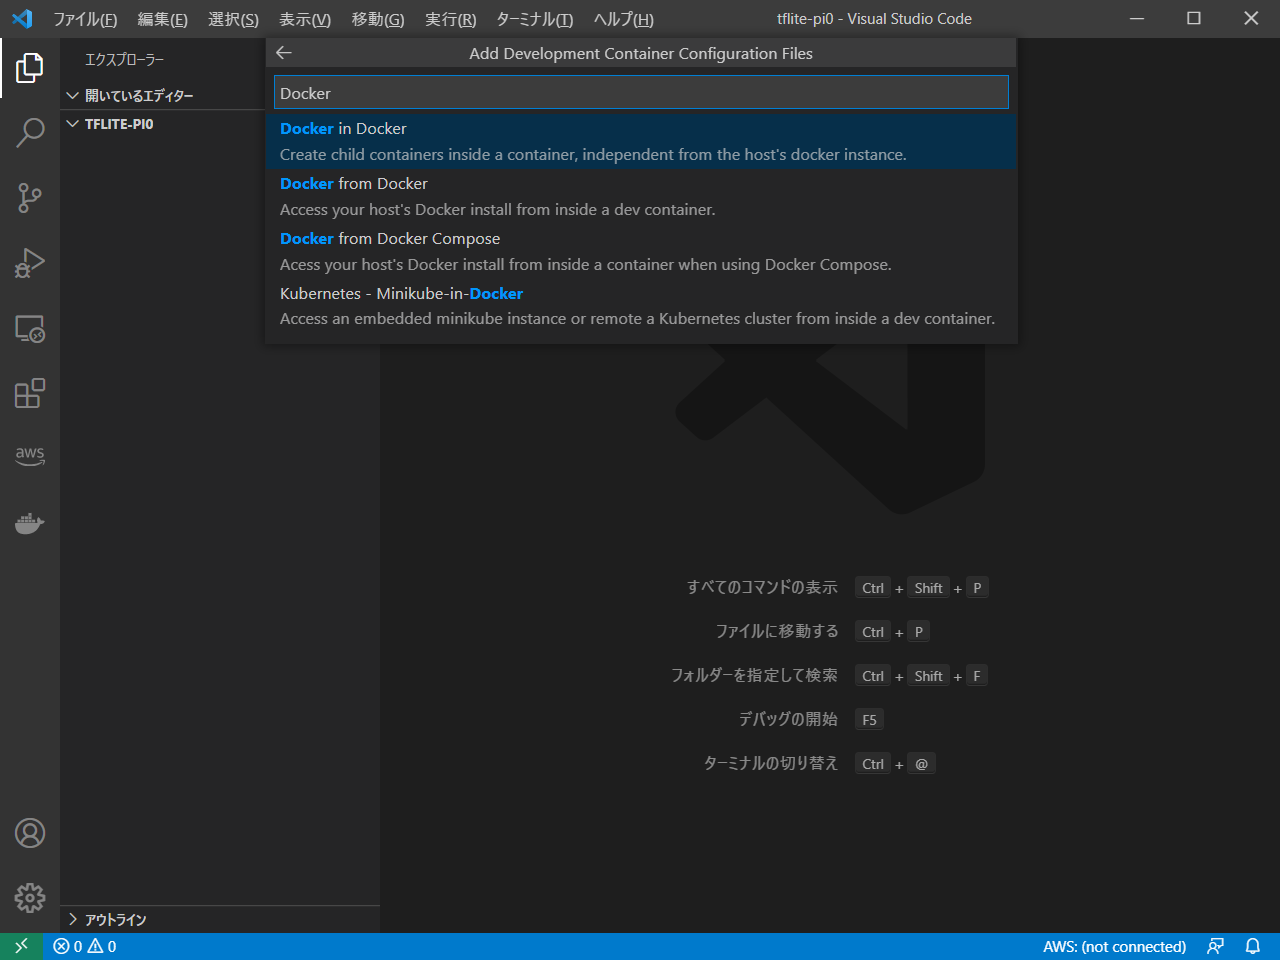
「Add Development Container Configuration Files...」を選択 image.png

「Show All Definitions...」を選択 image.png

「Docker in Docker」を選択 image.png

これで設定ファイルができました

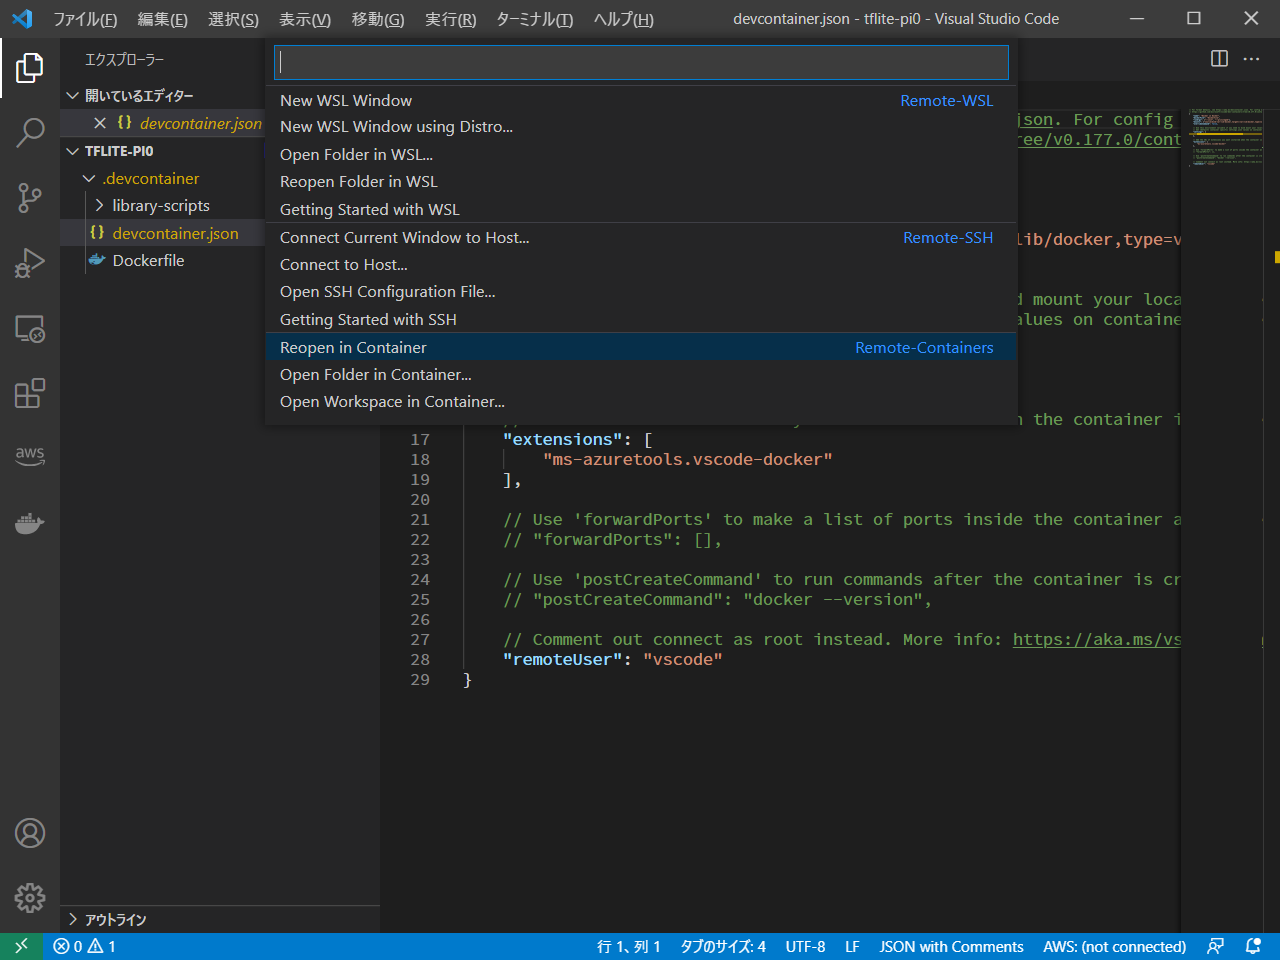
「Reopen in Container」を選択 image.png

ここから先はコンテナ内での作業になります。

Python Wheelパッケージの作成

公式の手順はこちらです。 https://www.tensorflow.org/lite/guide/build_cmake https://www.tensorflow.org/lite/guide/build_cmake_pip

Docker-in-Docker
cd # 作業は/root配下で行いました
sudo apt-get update
sudo apt-get install cmake -y
git clone https://github.com/tensorflow/tensorflow.git tensorflow_src
cd tensorflow_src/
tensorflow/tools/ci_build/ci_build.sh PI-PYTHON37 tensorflow/lite/tools/pip_package/build_pip_package_with_cmake.sh rpi0 # 最後のrpi0が重要です

これでWheelパッケージが作成されます 出力先はこちらです

Docker-in-Docker
~/tensorflow_src $ ls -l tensorflow/lite/tools/pip_package/gen/tflite_pip/python3.7/dist/
total 2776
-rw-r--r-- 1 vscode vscode 1414958 Jun 6 05:39 tflite_runtime-2.6.0-cp37-cp37m-linux_armv6l.whl
-rw-r--r-- 1 vscode vscode 1422521 Jun 6 05:39 tflite-runtime-2.6.0.linux_armv6l.tar.gz
~/tensorflow_src $

ラズパイZeroにTensorFlow Liteをインストールする

RaspberryPiZero
sudo apt-get update
sudo apt install libatlas-base-dev -y
pip install tflite_runtime-2.6.0-cp37-cp37m-linux_armv6l.whl

· 約3分
moritalous
お知らせ

過去にQiitaに投稿した内容のアーカイブです。

AWS Summit Online 2021が開催中です。 https://summits-japan.virtual.awsevents.com/

すごくたくさんのセッションがあるのですが、ふと、どんな分野が流行りなのかなぁと思ったのでセッションの情報を分析してみました。

使用したツール

僕にはなんにもスキルがありませんので、便利なサイトを利用させていただきました。

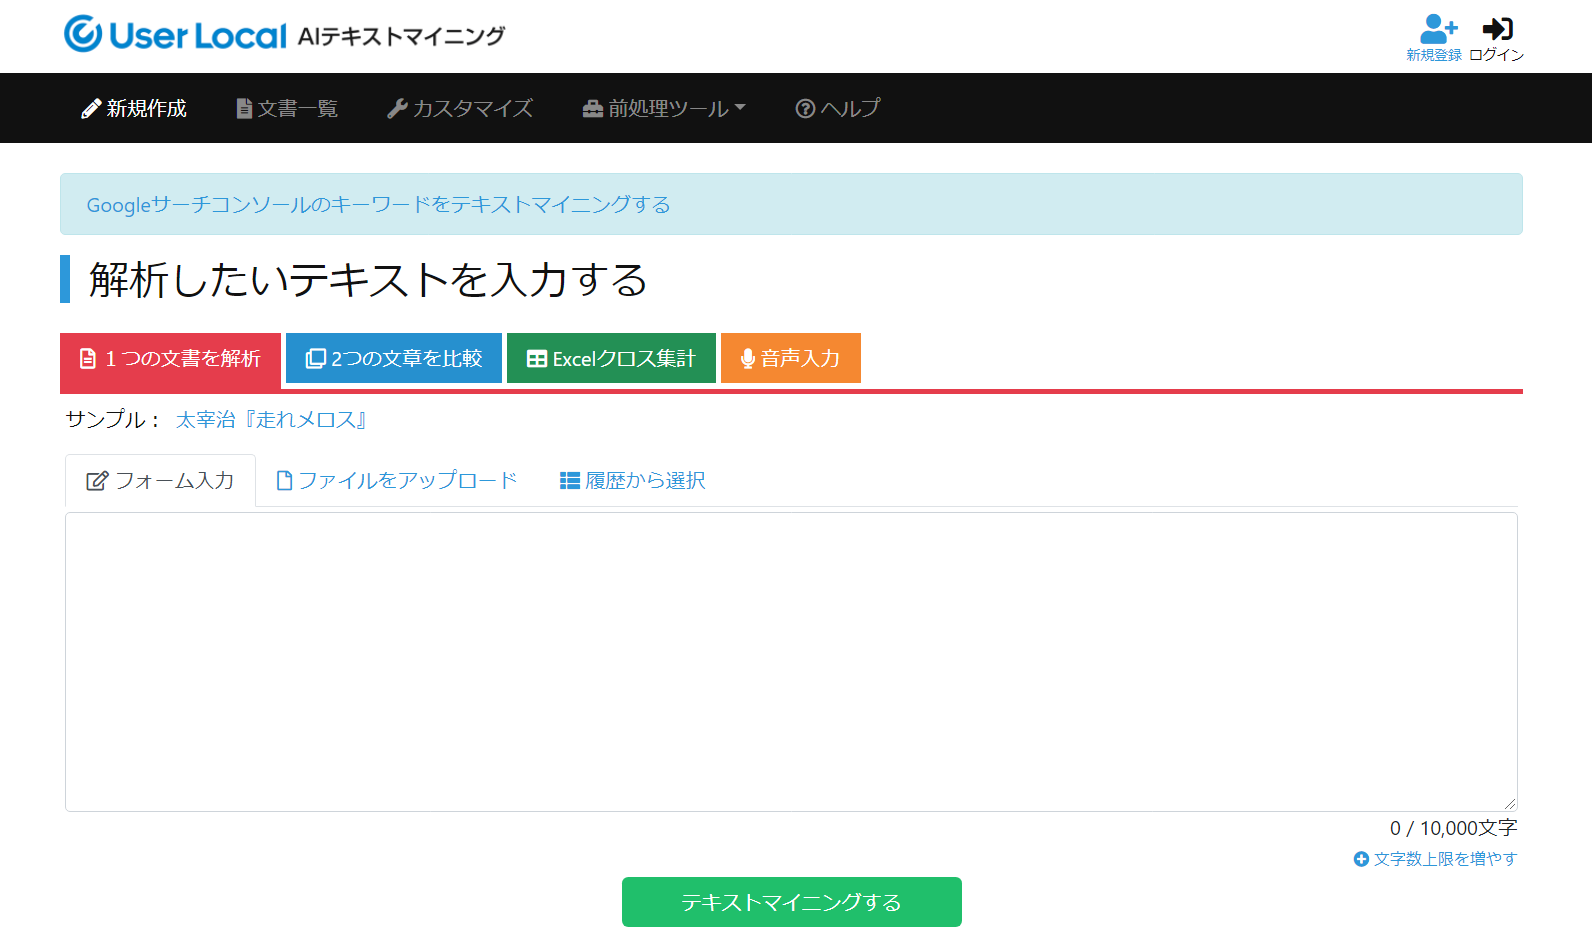
AIテキストマイニング by ユーザーローカル https://textmining.userlocal.jp/

image.png

データ取得方法

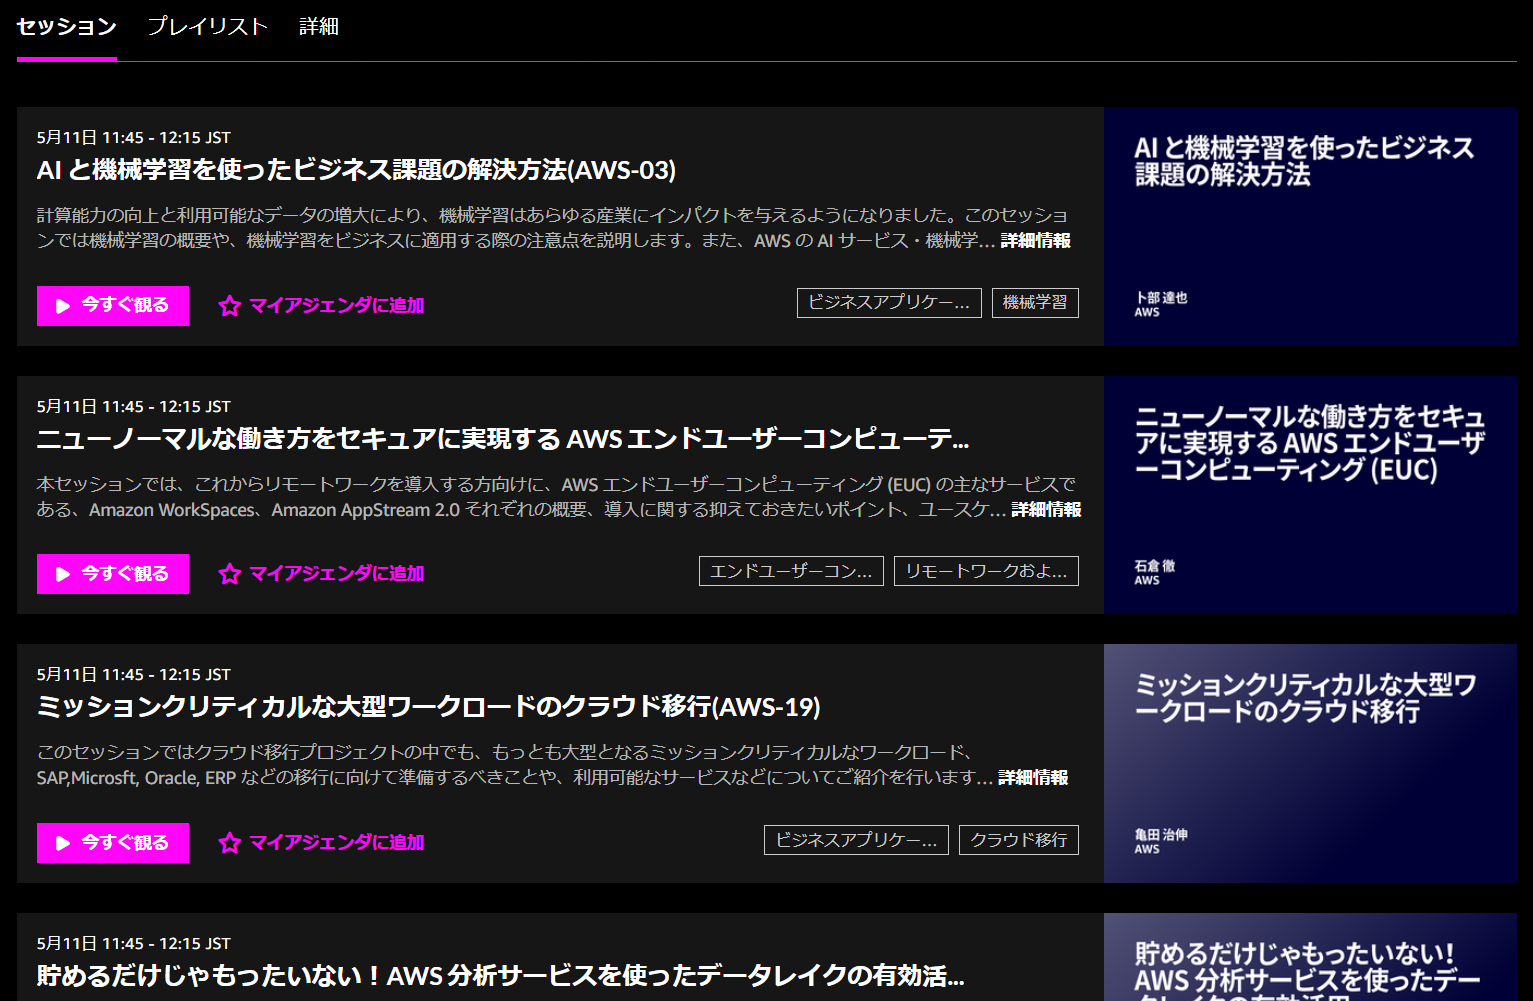
セッションの一覧ページは、こんな感じで、タイトルと説明文で構成されています。 説明文が途中で切れてますが、このまま使用しました。

image.png

Chrome DevToolsのConsoleタブで以下のコマンド実行で取得できました。

タイトルの取得
item__name = ''
document.querySelectorAll('.event-list-item__name').forEach(value => item__name = item__name + value.innerText + '\n')
item__name
copy(item__name) // クリップボードにコピー
説明文の取得
item__description = ''
document.querySelectorAll('.event-list-item__description').forEach(value => item__description = item__description + value.innerText + '\n')
item__description
copy(item__description) // クリップボードにコピー

結果

セッションがAWSセッションとパートナーセッションに分かれているのでそれぞれでやってみました。

AWSセッション編

ワードクラウド

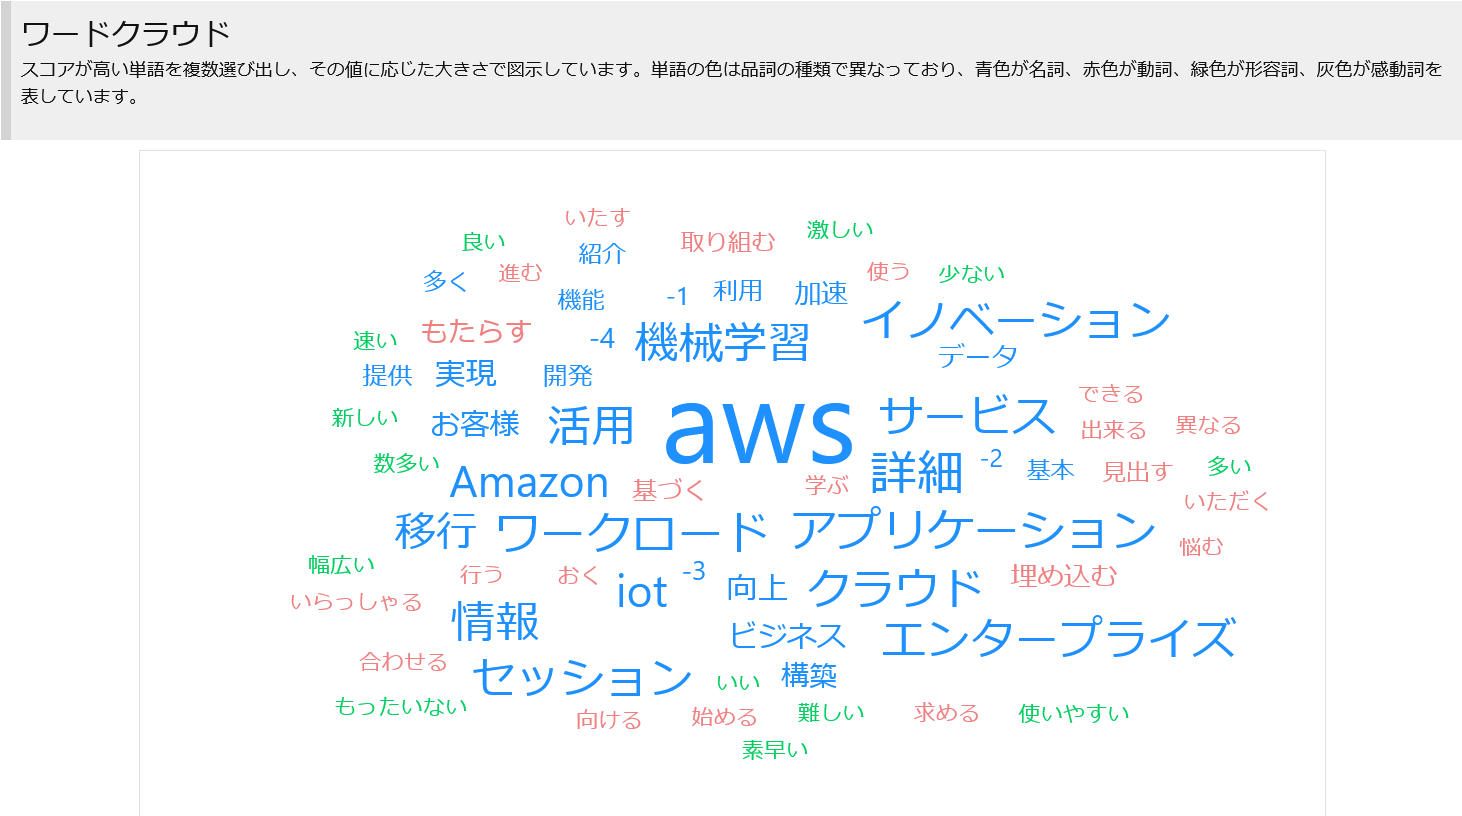
image.png

AWSは当然ですが、機械学習ワークロードなどが目を引く感じでしょうか

頻出単語(名詞)

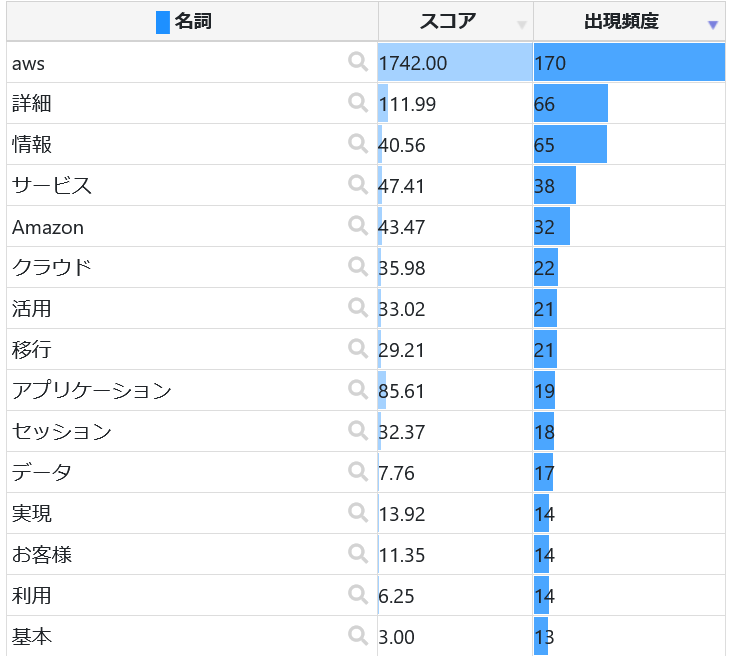
image.png

先程のワードクラウドとはちょっと結果が異なる感じでしょうか。詳細情報は説明文の末尾に必ず詳細情報とあるので、それが出てるだけと思います。

パートナーセッション編

ワードクラウド

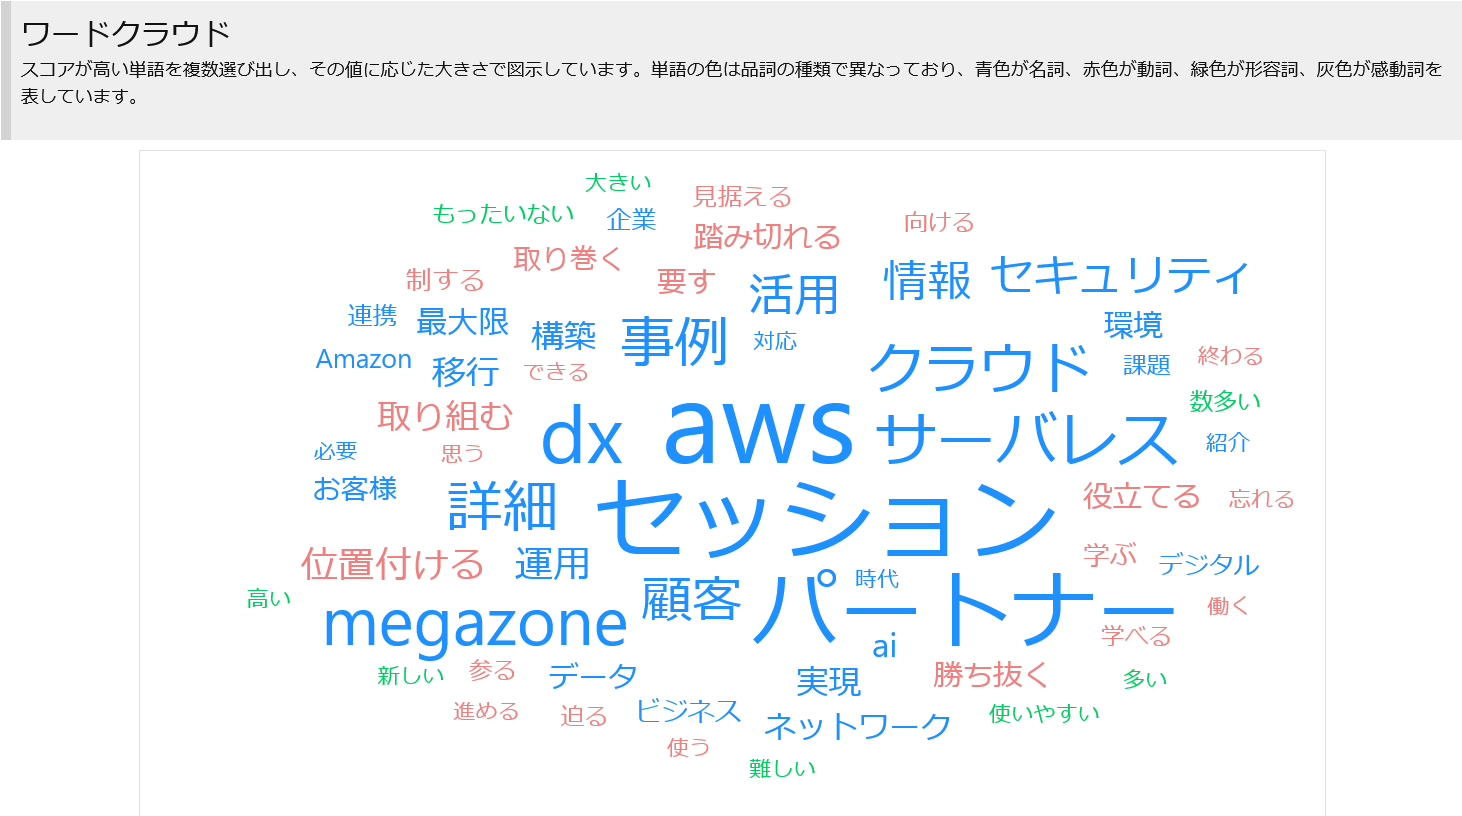
image.png

パートナーセッションだけに、パートナーの文字がでかい!!。AWSセッションとの違いではdxサーバレスの大きさが目を引きますね。

頻出単語(名詞)

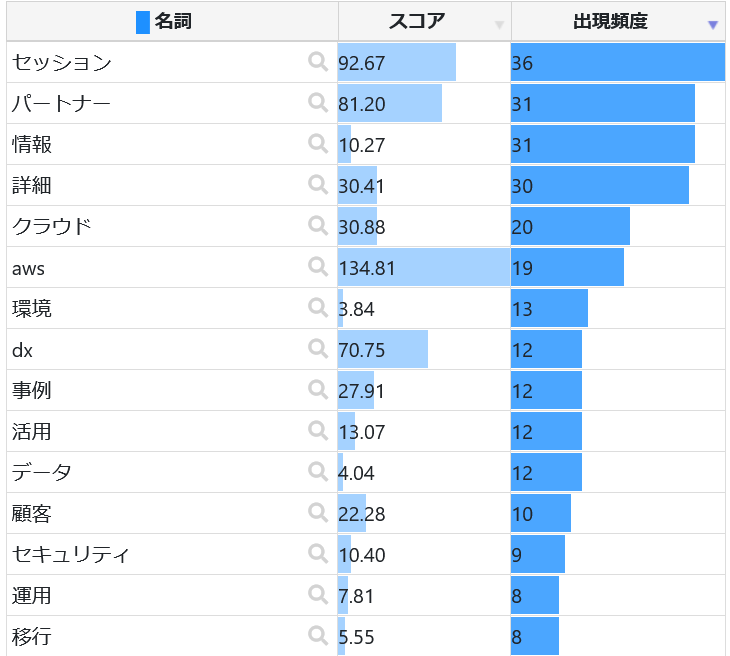
image.png

セキュリティがパートナーセッションの方だけランクインですね。

以上です。