OpenSearchとは
OpenSearch は、リアルタイムのアプリケーションモニタリング、ログ分析、ウェブサイト検索などの幅広いユースケースにご利用いただける分散型、コミュニティ主導型、Apache 2.0 ライセンス、100% オープンソースの検索および分析スイートです。OpenSearch は、統合された視覚化ツールである OpenSearch ダッシュボードを使用して、大量のデータへの高速アクセスと応答を提供するための高度にスケーラブルなシステムを提供します。これにより、ユーザーはデータを簡単に探索できます。OpenSearch は、Apache Lucene 検索ライブラリを搭載しており、k近傍 (KNN) 検索、SQL、異常検出、機械学習コモンズ、トレース分析、フルテキスト検索など、多くの検索および分析機能をサポートしています。
引用元:OpenSearchとは
OpenSearch誕生の経緯
2021年1月21日 AWSをElasticが名指しで非難。ElasticsearchとKibanaのライセンスを、AWSが勝手にマネージドサービスで提供できないように変更へ
2021年1月25日 AWS、商用サービス化を制限するライセンス変更に対抗し「Elasticsearch」をフォーク、独自のオープンソース版へ
2021年4月13日 AWS、ElasticsearchとKibanaのフォークによる「OpenSearch」プロジェクトを発表。Elasticとの溝は埋まらないまま
2021年8月10日 ElasticのクライアントライブラリがAWS OpenSearchへの接続を排除。AWSは仕方なくクライアントライブラリのフォークを発表
2021年9月10日 「Amazon Elasticsearch Service」の名称が「Amazon OpenSearch Service」に変更。ElasticsearchからフォークしたOpenSearchも採用
2022年2月17日 Elastic、AWSとの「Elasticsearch」に関する商標問題が解決したと発表。今後「Elasticsearch」を名乗るのはElasticのみに
OpenSearchのコンポーネント
OpenSearchは以下のコンポーネントで構成されています。
| コンポーネント | 説明 |
|---|---|
| OpenSearch | データストアと検索エンジン |
| OpenSearch Dashboards | フロントエンドとビジュアライゼーションを検索 |
| Security | クラスターの認証とアクセス制御 |
| Alerting | データが特定の条件を満たしたときに通知を受け取る |
| SQL | SQL またはパイプ処理言語を使用してデータをクエリする |
| Index State Management | インデックス操作を自動化する |
| KNN | ベクターデータで「最近傍」を見つける |
| Performance Analyzer | クラスターを監視して最適化する |
| Anomaly detection | 非定型データを特定し、自動通知を受け取る |
| ML Commons plugin | 機械学習モデルのトレーニングと実行 |
| Asynchronous search | バックグラウンドで検索リクエストを実行する |
| Cross-cluster replication | 複数の OpenSearch クラスター間でデータを複製する |
OpenSearchのインストール
インストールガイドに従ってインストールします。私はWSL2上にDockerで構築しました。
Docker Compose ファイルの作成
以下のdocker-compose.yamlファイルを作成します。
version: '3'
services:
  opensearch-node1:
    image: opensearchproject/opensearch:2.2.0
    container_name: opensearch-node1
    environment:
      - cluster.name=opensearch-cluster
      - node.name=opensearch-node1
      - bootstrap.memory_lock=true # along with the memlock settings below, disables swapping
      - "OPENSEARCH_JAVA_OPTS=-Xms512m -Xmx512m" # minimum and maximum Java heap size, recommend setting both to 50% of system RAM
      - "DISABLE_INSTALL_DEMO_CONFIG=true" # disables execution of install_demo_configuration.sh bundled with security plugin, which installs demo certificates and security configurations to OpenSearch
      - "DISABLE_SECURITY_PLUGIN=true" # disables security plugin entirely in OpenSearch by setting plugins.security.disabled: true in opensearch.yml
      - "discovery.type=single-node" # disables bootstrap checks that are enabled when network.host is set to a non-loopback address
    ulimits:
      memlock:
        soft: -1
        hard: -1
      nofile:
        soft: 65536 # maximum number of open files for the OpenSearch user, set to at least 65536 on modern systems
        hard: 65536
    volumes:
      - opensearch-data1:/usr/share/opensearch/data
    ports:
      - 9200:9200
      - 9600:9600 # required for Performance Analyzer
    networks:
      - opensearch-net

  opensearch-dashboards:
    image: opensearchproject/opensearch-dashboards:2.2.0
    container_name: opensearch-dashboards
    ports:
      - 5601:5601
    expose:
      - "5601"
    environment:
      - 'OPENSEARCH_HOSTS=["http://opensearch-node1:9200"]'
      - "DISABLE_SECURITY_DASHBOARDS_PLUGIN=true" # disables security dashboards plugin in OpenSearch Dashboards
    networks:
      - opensearch-net

volumes:
  opensearch-data1:

networks:
  opensearch-net:
OpenSearchの起動
docker compose up
起動できました。
OpenSearch Dashboardsにアクセス
OpenSearchとOpenSearch Dashboards起動後、http://localhost:5601/でOpenSearch Dashboardsにアクセスできます。
DISABLE_SECURITY_DASHBOARDS_PLUGINを指定しているのでセキュリティプラグインがオフの状態です。そのため、ログインは不要です。
本来は正しくセキュリティプラグインを有効化させましょう。

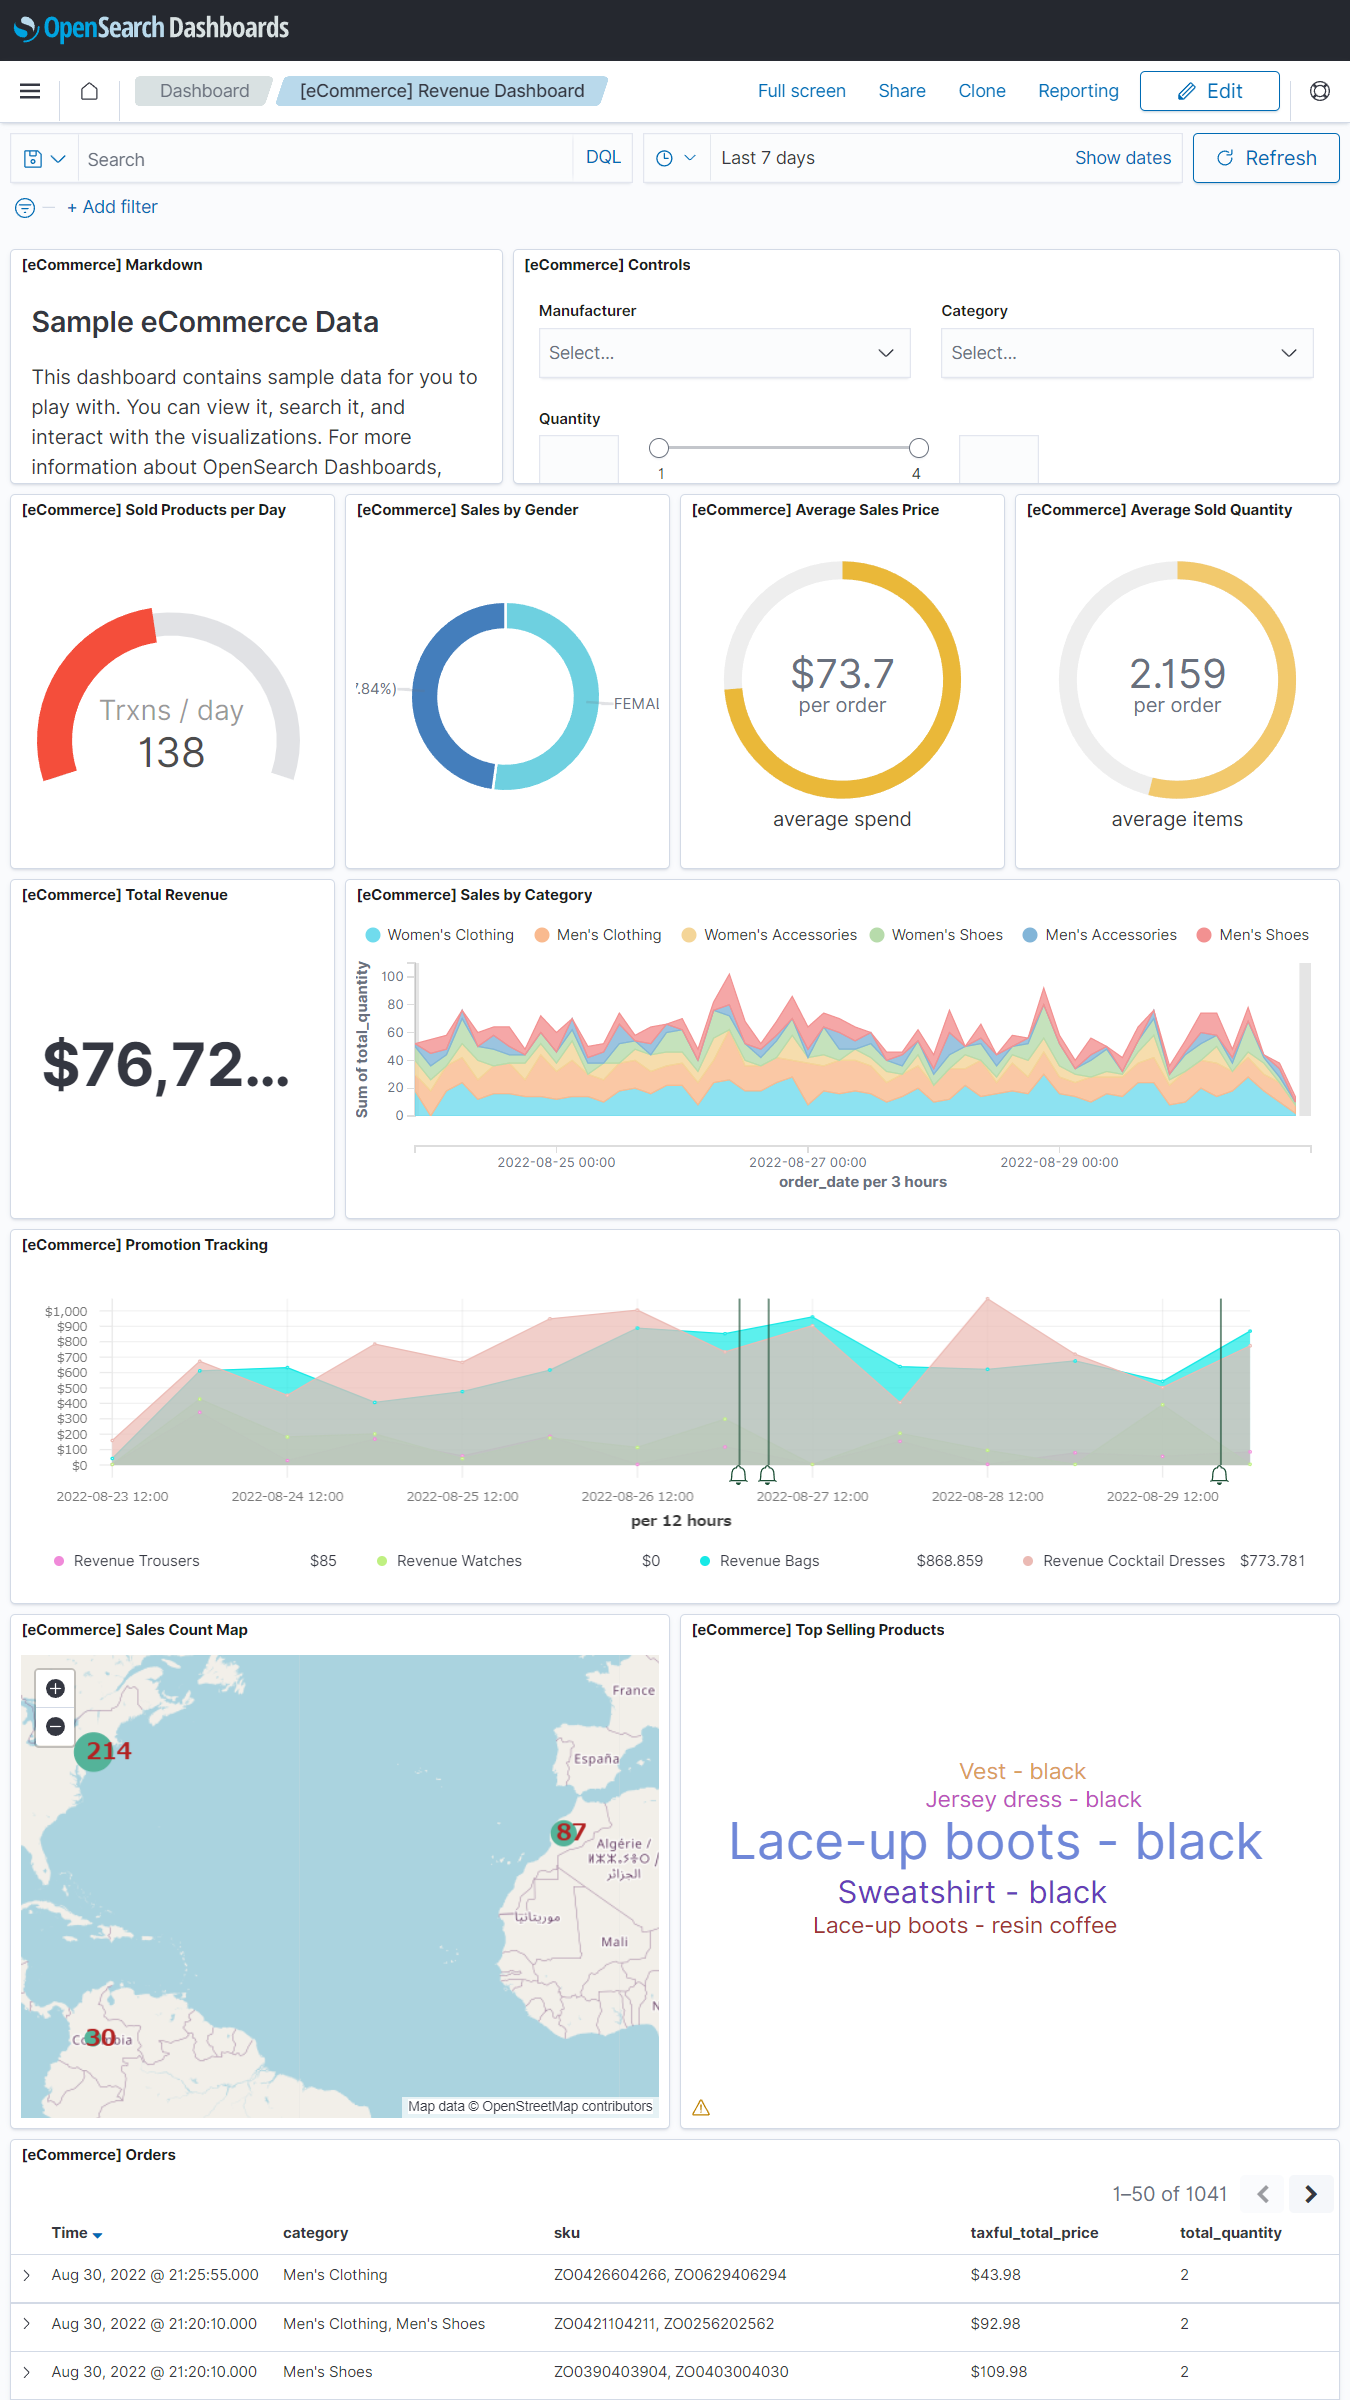
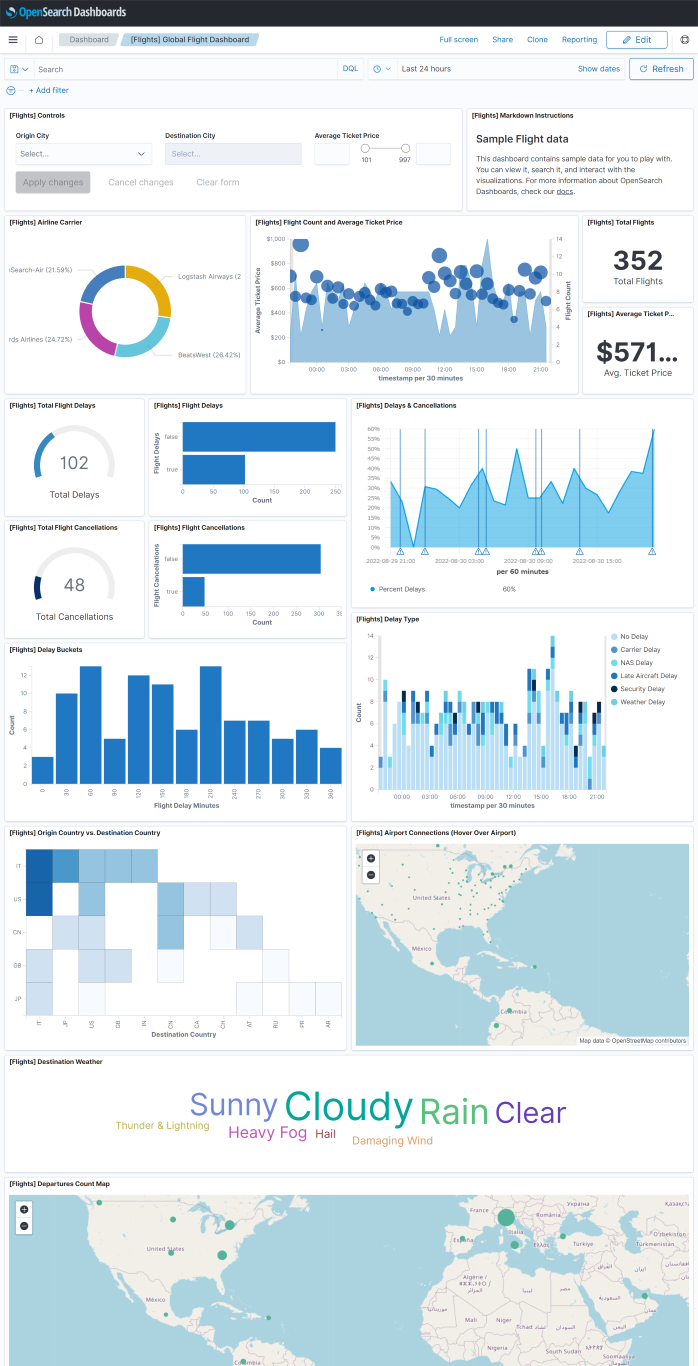
サンプルデータが用意されているので、Add dataボタンを押して追加しましょう。
追加できるサンプルデータはSample eCommerce orders、Sample flight data、Sample web logsの3つです。1つだけ追加することもできますし、3つすべて追加することもできます。
- Sample eCommerce orders
- Sample flight data
- Sample web logs
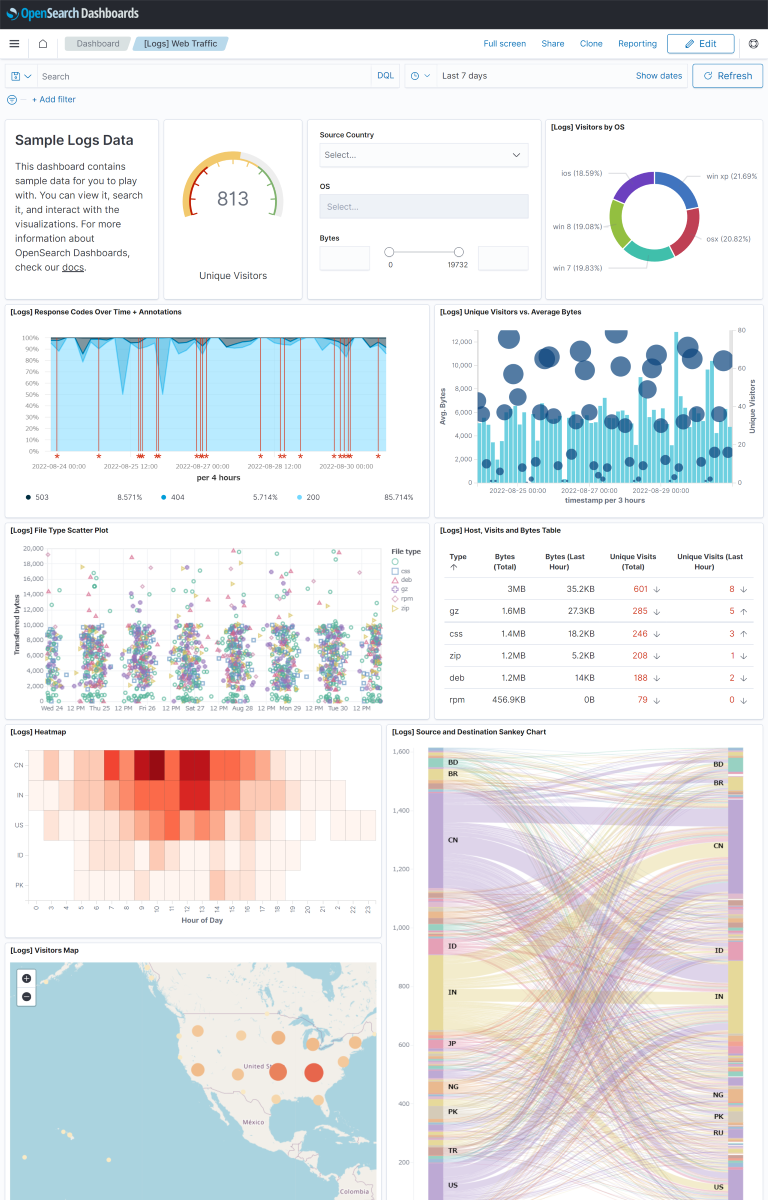
かなりリッチな見た目です
(オプション)Performance Analyzerの設定
Performance Analyzerプラグインを有効化する
curl -XPOST localhost:9200/_plugins/_performanceanalyzer/cluster/config -H 'Content-Type: application/json' -d '{"enabled": true}'Root Cause Analyzer (RCA) frameworkを有効化する
curl -XPOST localhost:9200/_plugins/_performanceanalyzer/rca/cluster/config -H 'Content-Type: application/json' -d '{"enabled": true}'